六、文章搜索

创建组件并配置路由
1、创建 src/views/search/index.vue
<template>
  <div class="search-container">搜索页面</div>
</template>

<script>
  export default {
    name: "SearchPage",
    components: {},
    props: {},
    data() {
      return {};
    },
    computed: {},
    watch: {},
    created() {},
    methods: {}
  };
</script>

<style scoped></style>
|
2、然后把搜索页面的路由配置到根组件路由(一级路由)
{
  path: '/search',
  omponent: Search
}
|
最后访问 /search 测试。
页面布局
1、创建 src/views/search/components/search-history.vue
<template>
  <div class="search-history">
    <van-cell title="搜索历史">
      <span>全部删除</span>
      <span>完成</span>
      <van-icon name="delete" />
    </van-cell>
    <van-cell title="hello">
      <van-icon name="close" />
    </van-cell>
    <van-cell title="hello">
      <van-icon name="close" />
    </van-cell>
    <van-cell title="hello">
      <van-icon name="close" />
    </van-cell>
    <van-cell title="hello">
      <van-icon name="close" />
    </van-cell>
  </div>
</template>

<script>
export default {
  name: 'SearchHistory',
  components: {},
  props: {},
  data () {
    return {}
  },
  computed: {},
  watch: {},
  created () {},
  mounted () {},
  methods: {}
}
</script>

<style scoped lang="less"></style>
|
2、创建 src/views/search/components/search-suggestion.vue
<template>
  <div class="search-suggestion">
    <van-cell title="黑马程序员..." icon="search"></van-cell>
    <van-cell title="黑马程序员..." icon="search"></van-cell>
    <van-cell title="黑马程序员..." icon="search"></van-cell>
    <van-cell title="黑马程序员..." icon="search"></van-cell>
    <van-cell title="黑马程序员..." icon="search"></van-cell>
  </div>
</template>

<script>
export default {
  name: 'SearchSuggestion',
  components: {},
  props: {},
  data () {
    return {}
  },
  computed: {},
  watch: {},
  created () {},
  mounted () {},
  methods: {}
}
</script>

<style scoped lang="less"></style>
|
3、创建 src/views/search/components/search-result.vue
<template>
<div class="search-result">
<van-list
v-model="loading"
:finished="finished"
finished-text="没有更多了"
@load="onLoad"
>
<van-cell v-for="item in list" :key="item" :title="item" />
</van-list>
</div>
</template>
<script>
export default {
name: 'SearchResult',
components: {},
props: {},
data () {
return {
list: [],
loading: false,
finished: false
}
},
computed: {},
watch: {},
created () {},
mounted () {},
methods: {
onLoad () {
setTimeout(() => {
for (let i = 0; i < 10; i++) {
this.list.push(this.list.length + 1)
}
this.loading = false
if (this.list.length >= 40) {
this.finished = true
}
}, 1000)
}
}
}
</script>
<style scoped lang="less"></style>
|
4、搜索组件内容如下:
<template>
<div class="search-container">
<form action="/">
<van-search
v-model="searchText"
show-action
placeholder="请输入搜索关键词"
background="#3296fa"
@search="onSearch"
@cancel="onCancel"
/>
</form>
<search-history />
<search-suggestion />
<search-result />
</div>
</template>
<script>
import SearchHistory from './components/search-history'
import SearchSuggestion from './components/search-suggestion'
import SearchResult from './components/search-result'
export default {
name: 'SearchIndex',
components: {
SearchHistory,
SearchSuggestion,
SearchResult
},
props: {},
data () {
return {
searchText: ''
}
},
computed: {},
watch: {},
created () {},
mounted () {},
methods: {
onSearch (val) {
console.log(val)
},
onCancel () {
this.$router.back()
}
}
}
</script>
<style scoped lang="less">
.search-container {
.van-search__action {
color: #fff;
}
}
</style>
|
处理页面显示状态
1、在 data 中添加数据用来控制搜索结果的显示状态
data () {
  ...
  isResultShow: false
}
|
2、在模板中绑定条件渲染
<search-result v-if="isResultShow" />
<search-suggestion v-else-if="searchText" />
<search-history v-else />
|
搜索联想建议
基本思路:
- 当搜索框输入内容的时候,请求加载联想建议的数据
- 将请求得到的结果绑定到模板中
基本功能
一、将父组件中搜索框输入的内容传给联想建议子组件
二、在子组件中监视搜索框输入内容的变化,如果变化则请求获取联想建议数据
三、将获取到的联想建议数据展示到列表中
防抖优化
1、安装 lodash
2、防抖处理
import { debounce } from "lodash"
|
不建议下面这样使用,因为这样会加载整个模块。
import _ from 'lodash'
_.debounce()
|
onSearchInput: debounce(async function () {
const searchContent = this.searchContent
if (!searchContent) {
return
}
const { data } = await getSuggestions(searchContent)
this.suggestions = data.data.options
}, 200),
|
搜索关键字高亮
如何将字符串中的指定字符在网页中高亮展示?
将需要高亮的字符包裹 HTML 标签,为其单独设置颜色。
"Hello <span style="color: red">World</span>"
|
在 Vue 中如何渲染带有 HTML 标签的字符串?
data () {
  return {
    htmlStr: 'Hello <span style="color: red">World</span>'
  }
}
|
<div>{{ htmlStr }}</div>
<div v-html="htmlStr"></div>
|

如何把字符串中指定字符统一替换为高亮(包裹了 HTML)的字符?
const str = "Hello World"
"Hello World".replace('Hello', '<span style="color: red">Hello</span>')
"Hello World Hello abc".replace('Hello', '<span style="color: red">Hello</span>')
"Hello World Hello abc".replace(/Hello/gi, '<span style="color: red">Hello</span>')
|
一个小扩展:使用字符串的 split 结合数组的 join 方法实现高亮
var str = "hello world 你好 hello";
const arr = str.split("hello");
arr.join("<span>hello</span>");
|
下面是具体的处理。
1、在 methods 中添加一个方法处理高亮
highlight (source, keyword) {
const reg = new RegExp(keyword, 'gi')
return source.replace(reg, `<span style="color: #3296fa">${keyword}</span>`)
},
|
2、然后在联想建议列表项中绑定调用
<van-cell-group v-else-if="searchContent">
<van-cell
icon="search"
v-for="(item, index) in suggestions"
:key="index"
@click="onSearch(item)"
>
<div slot="title" v-html="highlight(item, searchContent)"></div>
</van-cell>
</van-cell-group>
|
搜索结果
思路:
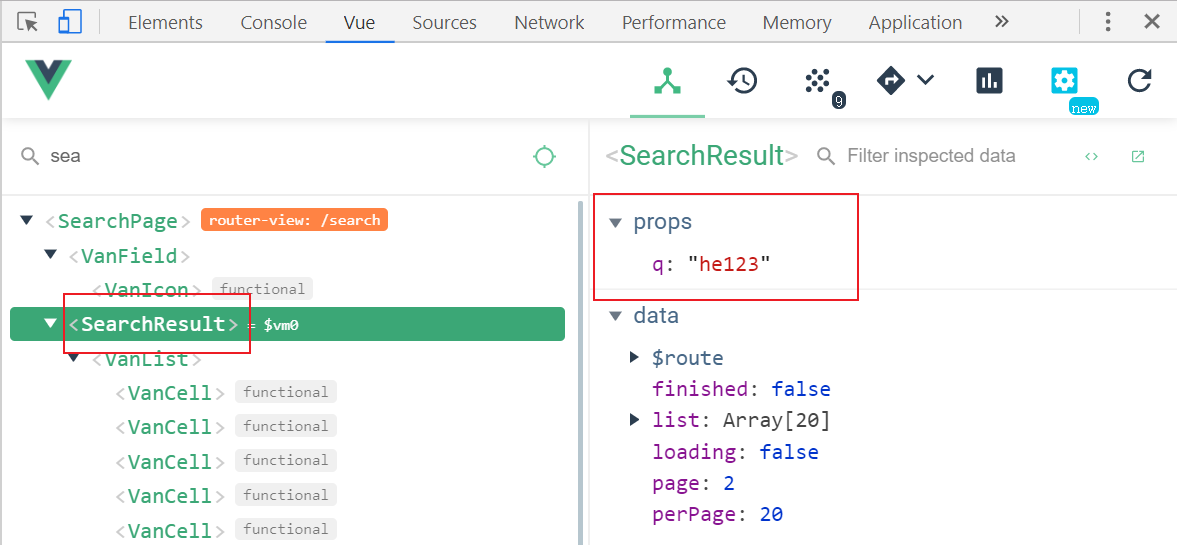
一、获取搜索关键字
1、声明接收父组件中的搜索框输入的内容
props: {
  q: {
    type: String,
    require: true
  }
},
|
2、在父组件给子组件传递数据
<search-result v-if="isResultShow" :q="searchText" />
|
最后在调试工具中查看确认是否接收到 props 数据。

二、请求获取数据
1、在 api/serach.js 添加封装获取搜索结果的请求方法
export function getSearch(params) {
return request({
method: "GET",
url: "/app/v1_0/search",
params
})
}
|
2、请求获取
+ import { getSearch } from '@/api/search'
export default {
name: 'SearchResult',
components: {},
props: {
q: {
type: String,
require: true
}
},
data () {
return {
list: [],
loading: false,
finished: false,
+ page: 1,
+ perPage: 20
}
},
computed: {},
watch: {},
created () {},
mounted () {},
methods: {
+++ async onLoad () {
const { data } = await getSearch({
page: this.page,
per_page: this.perPage,
q: this.q
})
const { results } = data.data
this.list.push(...results)
this.loading = false
if (results.length) {
this.page++
} else {
this.finished = true
}
}
}
}
|
三、最后,模板绑定
<van-list
  v-model="loading"
  :finished="finished"
  finished-text="没有更多了"
  @load="onLoad"
>
  <van-cell
+    v-for="(article, index) in list"
+    :key="index"
+    :title="article.title"
  />
</van-list>
|
搜索历史记录
添加历史记录
当发生搜索的时候我们才需要记录历史记录。
1、在 data 中添加一个数据用来存储历史记录
data () {
  return {
    ...
    searchHistories: []
  }
}
|
2、在触发搜索的时候,记录历史记录
onSearch (val) {
this.searchText = val
const index = this.searchHistories.indexOf(val)
if (index !== -1) {
this.searchHistories.splice(index, 1)
}
this.searchHistories.unshift(val)
this.isResultShow = true
},
|
展示历史记录
<van-cell-group v-else>
<van-cell title="历史记录">
<van-icon name="delete" />
<span>全部删除</span>
<span>完成</span>
</van-cell>
<van-cell
:title="item"
v-for="(item, index) in searchHistories"
:key="index"
>
<van-icon name="close"></van-icon>
</van-cell>
</van-cell-group>
|
删除历史记录
基本思路:
- 给历史记录中的每一项注册点击事件
- 在处理函数中判断
- 如果是删除状态,则执行删除操作
- 如果是非删除状态,则执行搜索操作
一、处理删除相关元素的展示状态
1、在 data 中添加一个数据用来控制删除相关元素的显示状态
data () {
  return {
    ...
    isDeleteShow: false
  }
}
|
2、绑定使用
<van-cell-group v-else>
<van-cell title="历史记录">
<template v-if="isDeleteShow">
<span @click="searchHistories = []">全部删除</span>
<span @click="isDeleteShow = false">完成</span>
</template>
<van-icon v-else name="delete" @click="isDeleteShow = true"></van-icon>
</van-cell>
<van-cell
:title="item"
v-for="(item, index) in searchHistories"
:key="index"
@click="onSearch(item)"
>
<van-icon
v-show="isDeleteShow"
name="close"
@click="searchHistories.splice(index, 1)"
></van-icon>
</van-cell>
</van-cell-group>
|
二、处理删除操作
<van-cell-group v-else>
<van-cell title="历史记录">
<template v-if="isDeleteShow">
+ <span @click="searchHistories = []">全部删除</span>
<span @click="isDeleteShow = false">完成</span>
</template>
<van-icon v-else name="delete" @click="isDeleteShow = true" />
</van-cell>
<van-cell
:title="item"
v-for="(item, index) in searchHistories"
:key="index"
+ @click="onHistoryClick(item, index)"
>
<van-icon v-show="isDeleteShow" name="close"></van-icon>
</van-cell>
</van-cell-group>
|
onHistoryClick (item, index) {
if (this.isDeleteShow) {
this.searchHistories.splice(index, 1)
} else {
this.onSearch(item)
}
}
|
数据持久化
1、利用 watch 监视统一存储数据
watch: {
searchHistories (val) {
setItem('serach-histories', val)
}
},
|
2、初始化的时候从本地存储获取数据
data () {
  return {
    ...
    searchHistories: getItem('serach-histories') || [],
  }
}
|


