Vue.js 课程介绍 什么是Vue.js
Vue.js 是目前最火的一个前端框架,React是最流行的一个前端框架(React除了开发网站,还可以开发手机App, Vue语法也是可以用于进行手机App开发的,需要借助于Weex)
Vue.js 是前端的主流框架之一 ,和Angular.js、React.js 一起,并成为前端三大主流框架!
Vue.js 是一套构建用户界面的框架,只关注视图层 ,它不仅易于上手,还便于与第三方库或既有项目整合。(Vue有配套的第三方类库,可以整合起来做大型项目的开发)
前端的主要工作?主要负责MVC中的V这一层;主要工作就是和界面打交道,来制作前端页面效果;
为什么要学习流行框架
企业为了提高开发效率:在企业中,时间就是效率,效率就是金钱;
提高开发效率的发展历程:原生JS -> Jquery之类的类库 -> 前端模板引擎 -> Angular.js / Vue.js(能够帮助我们减少不必要的DOM操作;提高渲染效率;双向数据绑定的概念【通过框架提供的指令,我们前端程序员只需要关心数据的业务逻辑,不再关心DOM是如何渲染的了】)
在Vue中,一个核心的概念,就是让用户不再操作DOM元素,解放了用户的双手,让程序员可以更多的时间去关注业务逻辑;
增强自己就业时候的竞争力
框架和库的区别
框架:是一套完整的解决方案;对项目的侵入性较大,项目如果需要更换框架,则需要重新架构整个项目。
库(插件):提供某一个小功能,对项目的侵入性较小,如果某个库无法完成某些需求,可以很容易切换到其它库实现需求。
从Jquery 切换到 Zepto
从 EJS 切换到 art-template
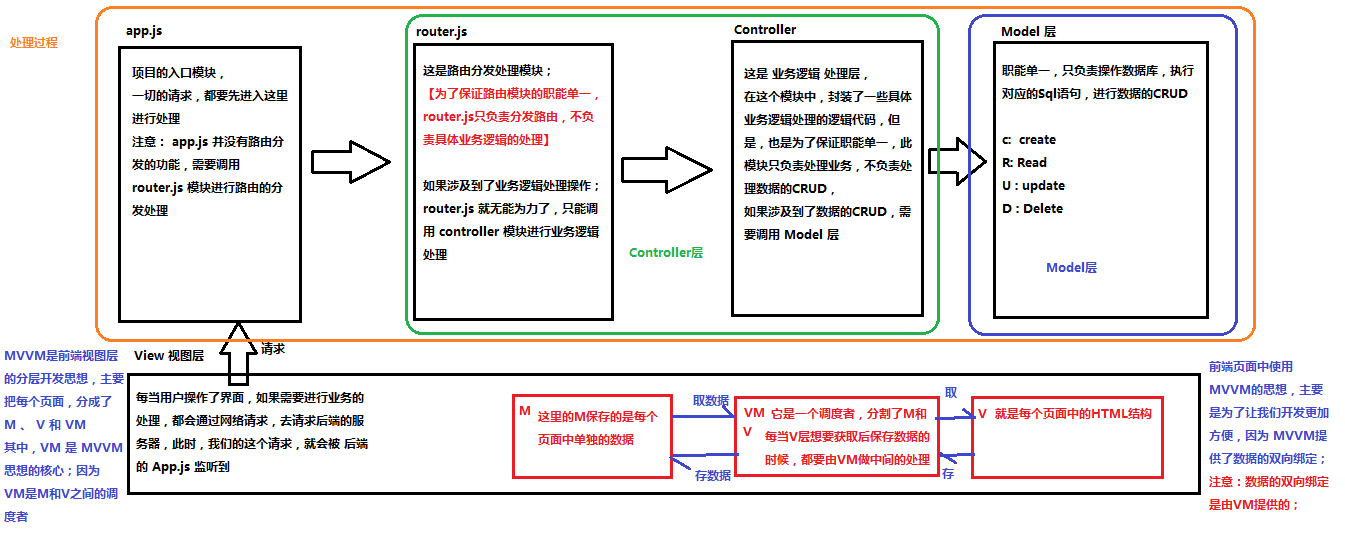
Node(后端)中的 MVC 与 前端中的 MVVM 之间的区别
MVC 是后端的分层开发概念;
MVVM是前端视图层的概念,主要关注于 视图层分离,也就是说:MVVM把前端的视图层,分为了 三部分 Model, View , VM ViewModel
为什么有了MVC还要有MVVM
Vue.js 基本代码 和 MVVM 之间的对应关系 <!DOCTYPE html> <html lang="en" > <head> <meta charset="UTF-8" > <meta name="viewport" content="width=device-width, initial-scale=1.0" > <meta http-equiv="X-UA-Compatible" content="ie=edge" > <title>Document</title> <!-- 1. 导入Vue的包 --> <script src="./lib/vue-2.4.0.js" ></script> </head> <body> <!-- 将来 new 的Vue实例,会控制这个 元素中的所有内容 --> <!-- Vue 实例所控制的这个元素区域,就是我们的 V --> <div id="app" > <p>{{ msg }}</p> </div> <script> var vm = new Vue({ el: '#app' , data: { msg: '欢迎学习Vue' } }) </script> </body> </html>
Vue之 - 基本的代码结构和插值表达式、v-cloak Vue指令之v-text和v-html Vue指令之v-bind的三种用法
直接使用指令v-bind
使用简化指令:
在绑定的时候,拼接绑定内容::title="btnTitle + ', 这是追加的内容'"
<!DOCTYPE html > <html lang ="en" > <head > <meta charset ="UTF-8" > <meta name ="viewport" content ="width=device-width, initial-scale=1.0" > <meta http-equiv ="X-UA-Compatible" content ="ie=edge" > <title > Document</title > <style > [v-cloak] { } </style > </head > <body > <div id ="app" > <p v-cloak > ++++++++ {{ msg }} ----------</p > <h4 v-text ="msg" > ==================</h4 > <div > {{msg2}}</div > <div v-text ="msg2" > </div > <div v-html ="msg2" > 1212112</div > <input type ="button" value ="按钮" @click ="show" > </div > <script src ="./lib/vue-2.4.0.js" > </script > <script > var vm = new Vue({ el : '#app' , data : { msg : '123' , msg2 : '<h1>哈哈,我是一个大大的H1, 我大,我骄傲</h1>' , mytitle : '这是一个自己定义的title' }, methods : { show : function ( alert('Hello' ) } } }) </script > </body > </html >
Vue指令之v-on和跑马灯效果 跑马灯效果 <!DOCTYPE html > <html lang ="en" > <head > <meta charset ="UTF-8" > <meta name ="viewport" content ="width=device-width, initial-scale=1.0" > <meta http-equiv ="X-UA-Compatible" content ="ie=edge" > <title > Document</title > <script src ="./lib/vue-2.4.0.js" > </script > </head > <body > <div id ="app" > <input type ="button" value ="浪起来" @click ="lang" > <input type ="button" value ="低调" @click ="stop" > <h4 > {{ msg }}</h4 > </div > <script > var vm = new Vue({ el : '#app' , data : { msg : '猥琐发育,别浪~~!' , intervalId : null }, methods : { lang ( if (this .intervalId != null ) return ; this .intervalId = setInterval (() => { var start = this .msg.substring(0 , 1 ) var end = this .msg.substring(1 ) this .msg = end + start }, 400 ) }, stop ( clearInterval (this .intervalId) this .intervalId = null ; } } }) </script > </body > </html >
Vue指令之v-on的缩写和事件修饰符 <!DOCTYPE html > <html lang ="en" > <head > <meta charset ="UTF-8" > <meta name ="viewport" content ="width=device-width, initial-scale=1.0" > <meta http-equiv ="X-UA-Compatible" content ="ie=edge" > <title > Document</title > <script src ="./lib/vue-2.4.0.js" > </script > <style > .inner { height : 150px ; background-color : darkcyan; } .outer { padding : 40px ; background-color : red; } </style > </head > <body > <div id ="app" > </div > <script > var vm = new Vue({ el : '#app' , data : {}, methods : { div1Handler ( console .log('这是触发了 inner div 的点击事件' ) }, btnHandler ( console .log('这是触发了 btn 按钮 的点击事件' ) }, linkClick ( console .log('触发了连接的点击事件' ) }, div2Handler ( console .log('这是触发了 outer div 的点击事件' ) } } }); </script > </body > </html >
事件修饰符:
Vue指令之v-model和双向数据绑定 <!DOCTYPE html > <html lang ="en" > <head > <meta charset ="UTF-8" > <meta name ="viewport" content ="width=device-width, initial-scale=1.0" > <meta http-equiv ="X-UA-Compatible" content ="ie=edge" > <title > Document</title > <script src ="./lib/vue-2.4.0.js" > </script > </head > <body > <div id ="app" > <h4 > {{ msg }}</h4 > <input type ="text" style ="width:100%;" v-model ="msg" > </div > <script > var vm = new Vue({ el : '#app' , data : { msg : '大家都是好学生,爱敲代码,爱学习,爱思考,简直是完美,没瑕疵!' }, methods : { } }); </script > </body > </html >
简易计算器案例 <!DOCTYPE html > <html lang ="en" > <head > <meta charset ="UTF-8" > <meta name ="viewport" content ="width=device-width, initial-scale=1.0" > <meta http-equiv ="X-UA-Compatible" content ="ie=edge" > <title > Document</title > <script src ="./lib/vue-2.4.0.js" > </script > </head > <body > <div id ="app" > <input type ="text" v-model ="n1" > <select v-model ="opt" > <option value ="+" > +</option > <option value ="-" > -</option > <option value ="*" > *</option > <option value ="/" > /</option > </select > <input type ="text" v-model ="n2" > <input type ="button" value ="=" @click ="calc" > <input type ="text" v-model ="result" > </div > <script > var vm = new Vue({ el : '#app' , data : { n1 : 0 , n2 : 0 , result : 0 , opt : '+' }, methods : { calc ( var codeStr = 'parseInt(this.n1) ' + this .opt + ' parseInt(this.n2)' this .result = eval (codeStr) } } }); </script > </body > </html >
在Vue中使用样式 使用class样式
数组
<h1 :class="['red', 'thin']">这是一个邪恶的H1</h1>
数组中使用三元表达式
<h1 :class="['red', 'thin', isactive?'active':'']">这是一个邪恶的H1</h1>
数组中嵌套对象
<h1 :class="['red', 'thin', {'active': isactive}]">这是一个邪恶的H1</h1>
直接使用对象
<h1 :class="{red:true, italic:true, active:true, thin:true}">这是一个邪恶的H1</h1>
具体例子:
<!DOCTYPE html > <html lang ="en" > <head > <meta charset ="UTF-8" > <meta name ="viewport" content ="width=device-width, initial-scale=1.0" > <meta http-equiv ="X-UA-Compatible" content ="ie=edge" > <title > Document</title > <script src ="./lib/vue-2.4.0.js" > </script > <style > .red { color : red; } .thin { font-weight : 200 ; } .italic { font-style : italic; } .active { letter-spacing : 0.5em ; } </style > </head > <body > <div id ="app" > <h1 :class ="classObj" > 这是一个很大很大的H1,大到你无法想象!!!</h1 > </div > <script > var vm = new Vue({ el : '#app' , data : { flag : true , classObj : { red : true , thin : true , italic : false , active : false } }, methods : {} }); </script > </body > </html >
使用内联样式
直接在元素上通过 :style 的形式,书写样式对象
<h1 :style="{color: 'red', 'font-size': '40px'}">这是一个善良的H1</h1>
将样式对象,定义到 data 中,并直接引用到 :style 中
在data上定义样式:data: { h1StyleObj: { color: 'red', 'font-size': '40px', 'font-weight': '200' } }
在元素中,通过属性绑定的形式,将样式对象应用到元素中:<h1 :style="h1StyleObj">这是一个善良的H1</h1>
在 :style 中通过数组,引用多个 data 上的样式对象
在data上定义样式:data: { h1StyleObj: { color: 'red', 'font-size': '40px', 'font-weight': '200' }, h1StyleObj2: { fontStyle: 'italic' } }
在元素中,通过属性绑定的形式,将样式对象应用到元素中:<h1 :style="[h1StyleObj, h1StyleObj2]">这是一个善良的H1</h1>
具体例子:
<!DOCTYPE html > <html lang ="en" > <head > <meta charset ="UTF-8" > <meta name ="viewport" content ="width=device-width, initial-scale=1.0" > <meta http-equiv ="X-UA-Compatible" content ="ie=edge" > <title > Document</title > <script src ="./lib/vue-2.4.0.js" > </script > </head > <body > <div id ="app" > <h1 :style ="[ styleObj1, styleObj2 ]" > 这是一个h1</h1 > </div > <script > var vm = new Vue({ el : '#app' , data : { styleObj1 : { color : 'red' , 'font-weight' : 200 }, styleObj2 : { 'font-style' : 'italic' } }, methods : {} }); </script > </body > </html >
Vue指令之v-for和key属性
迭代数组
<!DOCTYPE html > <html lang ="en" > <head > <meta charset ="UTF-8" > <meta name ="viewport" content ="width=device-width, initial-scale=1.0" > <meta http-equiv ="X-UA-Compatible" content ="ie=edge" > <title > Document</title > <script src ="./lib/vue-2.4.0.js" > </script > </head > <body > <div id ="app" > <p v-for ="(item, i) in list" > 索引值:{{i}} --- 每一项:{{item}}</p > </div > <script > var vm = new Vue({ el : '#app' , data : { list : [1 , 2 , 3 , 4 , 5 , 6 ] }, methods : {} }); </script > </body > </html >
<!DOCTYPE html > <html lang ="en" > <head > <meta charset ="UTF-8" > <meta name ="viewport" content ="width=device-width, initial-scale=1.0" > <meta http-equiv ="X-UA-Compatible" content ="ie=edge" > <title > Document</title > <script src ="./lib/vue-2.4.0.js" > </script > </head > <body > <div id ="app" > <p v-for ="(user, i) in list" > Id:{{ user.id }} --- 名字:{{ user.name }} --- 索引:{{i}}</p > </div > <script > var vm = new Vue({ el : '#app' , data : { list : [ { id : 1 , name : 'zs1' }, { id : 2 , name : 'zs2' }, { id : 3 , name : 'zs3' }, { id : 4 , name : 'zs4' } ] }, methods : {} }); </script > </body > </html >
2.迭代对象中的属性
<!DOCTYPE html > <html lang ="en" > <head > <meta charset ="UTF-8" > <meta name ="viewport" content ="width=device-width, initial-scale=1.0" > <meta http-equiv ="X-UA-Compatible" content ="ie=edge" > <title > Document</title > <script src ="./lib/vue-2.4.0.js" > </script > </head > <body > <div id ="app" > <p v-for ="(val, key, i) in user" > 值是: {{ val }} --- 键是: {{key}} -- 索引: {{i}}</p > </div > <script > var vm = new Vue({ el : '#app' , data : { user : { id : 1 , name : '托尼·屎大颗' , gender : '男' } }, methods : {} }); </script > </body > </html >
迭代数字
<!DOCTYPE html > <html lang ="en" > <head > <meta charset ="UTF-8" > <meta name ="viewport" content ="width=device-width, initial-scale=1.0" > <meta http-equiv ="X-UA-Compatible" content ="ie=edge" > <title > Document</title > <script src ="./lib/vue-2.4.0.js" > </script > </head > <body > <div id ="app" > <p v-for ="count in 10" > 这是第 {{ count }} 次循环</p > </div > <script > var vm = new Vue({ el : '#app' , data : {}, methods : {} }); </script > </body > </html >
2.2.0+ 的版本里,当在组件中使用 v-for 时,key 现在是必须的。
当 Vue.js 用 v-for 正在更新已渲染过的元素列表时,它默认用 “就地复用 ” 策略。如果数据项的顺序被改变,Vue将不是移动 DOM 元素来匹配数据项的顺序 , 而是简单复用此处每个元素 ,并且确保它在特定索引下显示已被渲染过的每个元素。
为了给 Vue 一个提示,以便它能跟踪每个节点的身份,从而重用和重新排序现有元素 ,你需要为每项提供一个唯一 key 属性。
Vue指令之v-if和v-show
一般来说,v-if 有更高的切换消耗而 v-show 有更高的初始渲染消耗。因此,如果需要频繁切换 v-show 较好,如果在运行时条件不大可能改变 v-if 较好。
<!DOCTYPE html > <html lang ="en" > <head > <meta charset ="UTF-8" > <meta name ="viewport" content ="width=device-width, initial-scale=1.0" > <meta http-equiv ="X-UA-Compatible" content ="ie=edge" > <title > Document</title > <script src ="./lib/vue-2.4.0.js" > </script > </head > <body > <div id ="app" > <input type ="button" value ="toggle" @click ="flag=!flag" > <h3 v-if ="flag" > 这是用v-if控制的元素</h3 > <h3 v-show ="flag" > 这是用v-show控制的元素</h3 > </div > <script > var vm = new Vue({ el : '#app' , data : { flag : false }, methods : { } }); </script > </body > </html >
品牌管理案例 添加新品牌 删除品牌 <!DOCTYPE html > <html lang ="en" > <head > <meta charset ="UTF-8" > <meta name ="viewport" content ="width=device-width, initial-scale=1.0" > <meta http-equiv ="X-UA-Compatible" content ="ie=edge" > <title > Document</title > <script src ="./lib/vue-2.4.0.js" > </script > <link rel ="stylesheet" href ="./lib/bootstrap-3.3.7.css" > </head > <body > <div id ="app" > <div class ="panel panel-primary" > <div class ="panel-heading" > <h3 class ="panel-title" > 添加品牌</h3 > </div > <div class ="panel-body form-inline" > <label > Id: <input type ="text" class ="form-control" v-model ="id" > </label > <label > Name: <input type ="text" class ="form-control" v-model ="name" > </label > <input type ="button" value ="添加" class ="btn btn-primary" @click ="add()" > <label > 搜索名称关键字: <input type ="text" class ="form-control" v-model ="keywords" > </label > </div > </div > <table class ="table table-bordered table-hover table-striped" > <thead > <tr > <th > Id</th > <th > Name</th > <th > Ctime</th > <th > Operation</th > </tr > </thead > <tbody > <tr v-for ="item in search(keywords)" :key ="item.id" > <td > {{ item.id }}</td > <td v-text ="item.name" > </td > <td > {{ item.ctime }}</td > <td > <a href ="" @click.prevent ="del(item.id)" > 删除</a > </td > </tr > </tbody > </table > </div > <script > var vm = new Vue({ el : '#app' , data : { id : '' , name : '' , keywords : '' , list : [ { id : 1 , name : '奔驰' , ctime : new Date () }, { id : 2 , name : '宝马' , ctime : new Date () } ] }, methods : { add ( var car = { id : this .id, name : this .name, ctime : new Date () } this .list.push(car) this .id = this .name = '' }, del (id ) var index = this .list.findIndex(item => if (item.id == id) { return true ; } }) this .list.splice(index, 1 ) }, search (keywords ) return this .list.filter(item => if (item.name.includes(keywords)) { return item } }) } } }); </script > </body > </html >
根据条件筛选品牌
1.x 版本中的filterBy指令,在2.x中已经被废除:
filterBy - 指令
<tr v-for ="item in list | filterBy searchName in 'name'" > <td > {{item.id}}</td > <td > {{item.name}}</td > <td > {{item.ctime}}</td > <td > <a href ="#" @click.prevent ="del(item.id)" > 删除</a > </td > </tr >
在2.x版本中手动实现筛选的方式 :
筛选框绑定到 VM 实例中的 searchName 属性:
<hr > 输入筛选名称:<input type ="text" v-model ="searchName" >
在使用 v-for 指令循环每一行数据的时候,不再直接 item in list,而是 in 一个 过滤的methods 方法,同时,把过滤条件searchName传递进去:
<tbody > <tr v-for ="item in search(searchName)" > <td > {{item.id}}</td > <td > {{item.name}}</td > <td > {{item.ctime}}</td > <td > <a href ="#" @click.prevent ="del(item.id)" > 删除</a > </td > </tr > </tbody >
search 过滤方法中,使用 数组的 filter 方法进行过滤:
search(name) {
  return this.list.filter(x => {
    return x.name.indexOf(name) != -1;
  });
}
<!DOCTYPE html > <html lang ="en" > <head > <meta charset ="UTF-8" > <meta name ="viewport" content ="width=device-width, initial-scale=1.0" > <meta http-equiv ="X-UA-Compatible" content ="ie=edge" > <title > Document</title > <script src ="./lib/vue-2.4.0.js" > </script > <link rel ="stylesheet" href ="./lib/bootstrap-3.3.7.css" > </head > <body > <div id ="app" > <div class ="panel panel-primary" > <div class ="panel-heading" > <h3 class ="panel-title" > 添加品牌</h3 > </div > <div class ="panel-body form-inline" > <label > Id: <input type ="text" class ="form-control" v-model ="id" > </label > <label > Name: <input type ="text" class ="form-control" v-model ="name" @keyup.f2 ="add" > </label > <input type ="button" value ="添加" class ="btn btn-primary" @click ="add()" > <label > 搜索名称关键字: <input type ="text" class ="form-control" v-model ="keywords" id ="search" v-focus v-color ="'green'" > </label > </div > </div > <table class ="table table-bordered table-hover table-striped" > <thead > <tr > <th > Id</th > <th > Name</th > <th > Ctime</th > <th > Operation</th > </tr > </thead > <tbody > <tr v-for ="item in search(keywords)" :key ="item.id" > <td > {{ item.id }}</td > <td v-text ="item.name" > </td > <td > {{ item.ctime | dateFormat() }}</td > <td > <a href ="" @click.prevent ="del(item.id)" > 删除</a > </td > </tr > </tbody > </table > </div > <div id ="app2" > <h3 v-color ="'pink'" v-fontweight ="900" v-fontsize ="50" > {{ dt | dateFormat }}</h3 > </div > <script > Vue.filter('dateFormat' , function (dateStr, pattern = "" ) var dt = new Date (dateStr) var y = dt.getFullYear() var m = dt.getMonth() + 1 var d = dt.getDate() if (pattern.toLowerCase() === 'yyyy-mm-dd' ) { return `${y} -${m} -${d} ` } else { var hh = dt.getHours() var mm = dt.getMinutes() var ss = dt.getSeconds() return `${y} -${m} -${d} ${hh} :${mm} :${ss} ` } }) Vue.config.keyCodes.f2 = 113 Vue.directive('focus' , { bind : function (el ) }, inserted : function (el ) el.focus() }, updated : function (el ) } }) Vue.directive('color' , { bind : function (el, binding ) el.style.color = binding.value } }) var vm = new Vue({ el : '#app' , data : { id : '' , name : '' , keywords : '' , list : [ { id : 1 , name : '奔驰' , ctime : new Date () }, { id : 2 , name : '宝马' , ctime : new Date () } ] }, methods : { add ( var car = { id : this .id, name : this .name, ctime : new Date () } this .list.push(car) this .id = this .name = '' }, del (id ) var index = this .list.findIndex(item => if (item.id == id) { return true ; } }) this .list.splice(index, 1 ) }, search (keywords ) return this .list.filter(item => if (item.name.includes(keywords)) { return item } }) } } }); var vm2 = new Vue({ el : '#app2' , data : { dt : new Date () }, methods : {}, filters : { dateFormat : function (dateStr, pattern = '' ) var dt = new Date (dateStr) var y = dt.getFullYear() var m = (dt.getMonth() + 1 ).toString().padStart(2 , '0' ) var d = dt.getDate().toString().padStart(2 , '0' ) if (pattern.toLowerCase() === 'yyyy-mm-dd' ) { return `${y} -${m} -${d} ` } else { var hh = dt.getHours().toString().padStart(2 , '0' ) var mm = dt.getMinutes().toString().padStart(2 , '0' ) var ss = dt.getSeconds().toString().padStart(2 , '0' ) return `${y} -${m} -${d} ${hh} :${mm} :${ss} ~~~~~~~` } } }, directives : { 'fontweight' : { bind : function (el, binding ) el.style.fontWeight = binding.value } }, 'fontsize' : function (el, binding ) el.style.fontSize = parseInt (binding.value) + 'px' } } }) </script > </body > </html >
Vue.js devtools - 翻墙安装方式 - 推荐
过滤器 概念:Vue.js 允许你自定义过滤器,可被用作一些常见的文本格式化 。过滤器可以用在两个地方:mustache 插值和 v-bind 表达式 。过滤器应该被添加在 JavaScript 表达式的尾部,由“管道”符指示;
私有过滤器
HTML元素:
<td > {{item.ctime | dataFormat('yyyy-mm-dd')}}</td >
私有 filters 定义方式:
filters: { // 私有局部过滤器,只能在 当前 VM 对象所控制的 View 区域进行使用
    dataFormat(input, pattern = "") { // 在参数列表中 通过 pattern="" 来指定形参默认值,防止报错
      var dt = new Date(input);
      // 获取年月日
      var y = dt.getFullYear();
      var m = (dt.getMonth() + 1).toString().padStart(2, '0');
      var d = dt.getDate().toString().padStart(2, '0');
      // 如果 传递进来的字符串类型,转为小写之后,等于 yyyy-mm-dd,那么就返回 年-月-日
      // 否则,就返回  年-月-日 时:分:秒
      if (pattern.toLowerCase() === 'yyyy-mm-dd') {
        return `${y}-${m}-${d}`;
      } else {
        // 获取时分秒
        var hh = dt.getHours().toString().padStart(2, '0');
        var mm = dt.getMinutes().toString().padStart(2, '0');
        var ss = dt.getSeconds().toString().padStart(2, '0');
        return `${y}-${m}-${d} ${hh}:${mm}:${ss}`;
      }
    }
  }
使用ES6中的字符串新方法 String.prototype.padStart(maxLength, fillString=’’) 或 String.prototype.padEnd(maxLength, fillString=’’)来填充字符串;
全局过滤器 // 定义一个全局过滤器 Vue.filter('dataFormat', function (input, pattern = '') { var dt = new Date(input); // 获取年月日 var y = dt.getFullYear(); var m = (dt.getMonth() + 1).toString().padStart(2, '0'); var d = dt.getDate().toString().padStart(2, '0'); // 如果 传递进来的字符串类型,转为小写之后,等于 yyyy-mm-dd,那么就返回 年-月-日 // 否则,就返回 年-月-日 时:分:秒 if (pattern.toLowerCase() === 'yyyy-mm-dd') { return `${y}-${m}-${d}`; } else { // 获取时分秒 var hh = dt.getHours().toString().padStart(2, '0'); var mm = dt.getMinutes().toString().padStart(2, '0'); var ss = dt.getSeconds().toString().padStart(2, '0'); return `${y}-${m}-${d} ${hh}:${mm}:${ss}`; } });
注意:当有局部和全局两个名称相同的过滤器时候,会以就近原则进行调用,即:局部过滤器优先于全局过滤器被调用!
键盘修饰符以及自定义键盘修饰符 1.x中自定义键盘修饰符【了解即可】 Vue.directive('on').keyCodes.f2 = 113;
通过Vue.config.keyCodes.名称 = 按键值来自定义案件修饰符的别名:
Vue.config.keyCodes.f2 = 113;
使用自定义的按键修饰符:
<input type="text" v-model="name" @keyup.f2="add">
自定义全局和局部的 自定义指令:
	// 自定义全局指令 v-focus,为绑定的元素自动获取焦点:
    Vue.directive('focus', {
      inserted: function (el) { // inserted 表示被绑定元素插入父节点时调用
        el.focus();
      }
    });

    // 自定义局部指令 v-color 和 v-font-weight,为绑定的元素设置指定的字体颜色 和 字体粗细:
      directives: {
        color: { // 为元素设置指定的字体颜色
          bind(el, binding) {
            el.style.color = binding.value;
          }
        },
        'font-weight': function (el, binding2) { // 自定义指令的简写形式,等同于定义了 bind 和 update 两个钩子函数
          el.style.fontWeight = binding2.value;
        }
}
自定义指令的使用方式:
<input type ="text" v-model ="searchName" v-focus v-color ="'red'" v-font-weight ="900" >
Vue 1.x 中 自定义元素指令【已废弃,了解即可】 Vue.elementDirective('red-color', { bind: function () { this.el.style.color = 'red'; } });
使用方式:
<red-color > 1232</red-color >
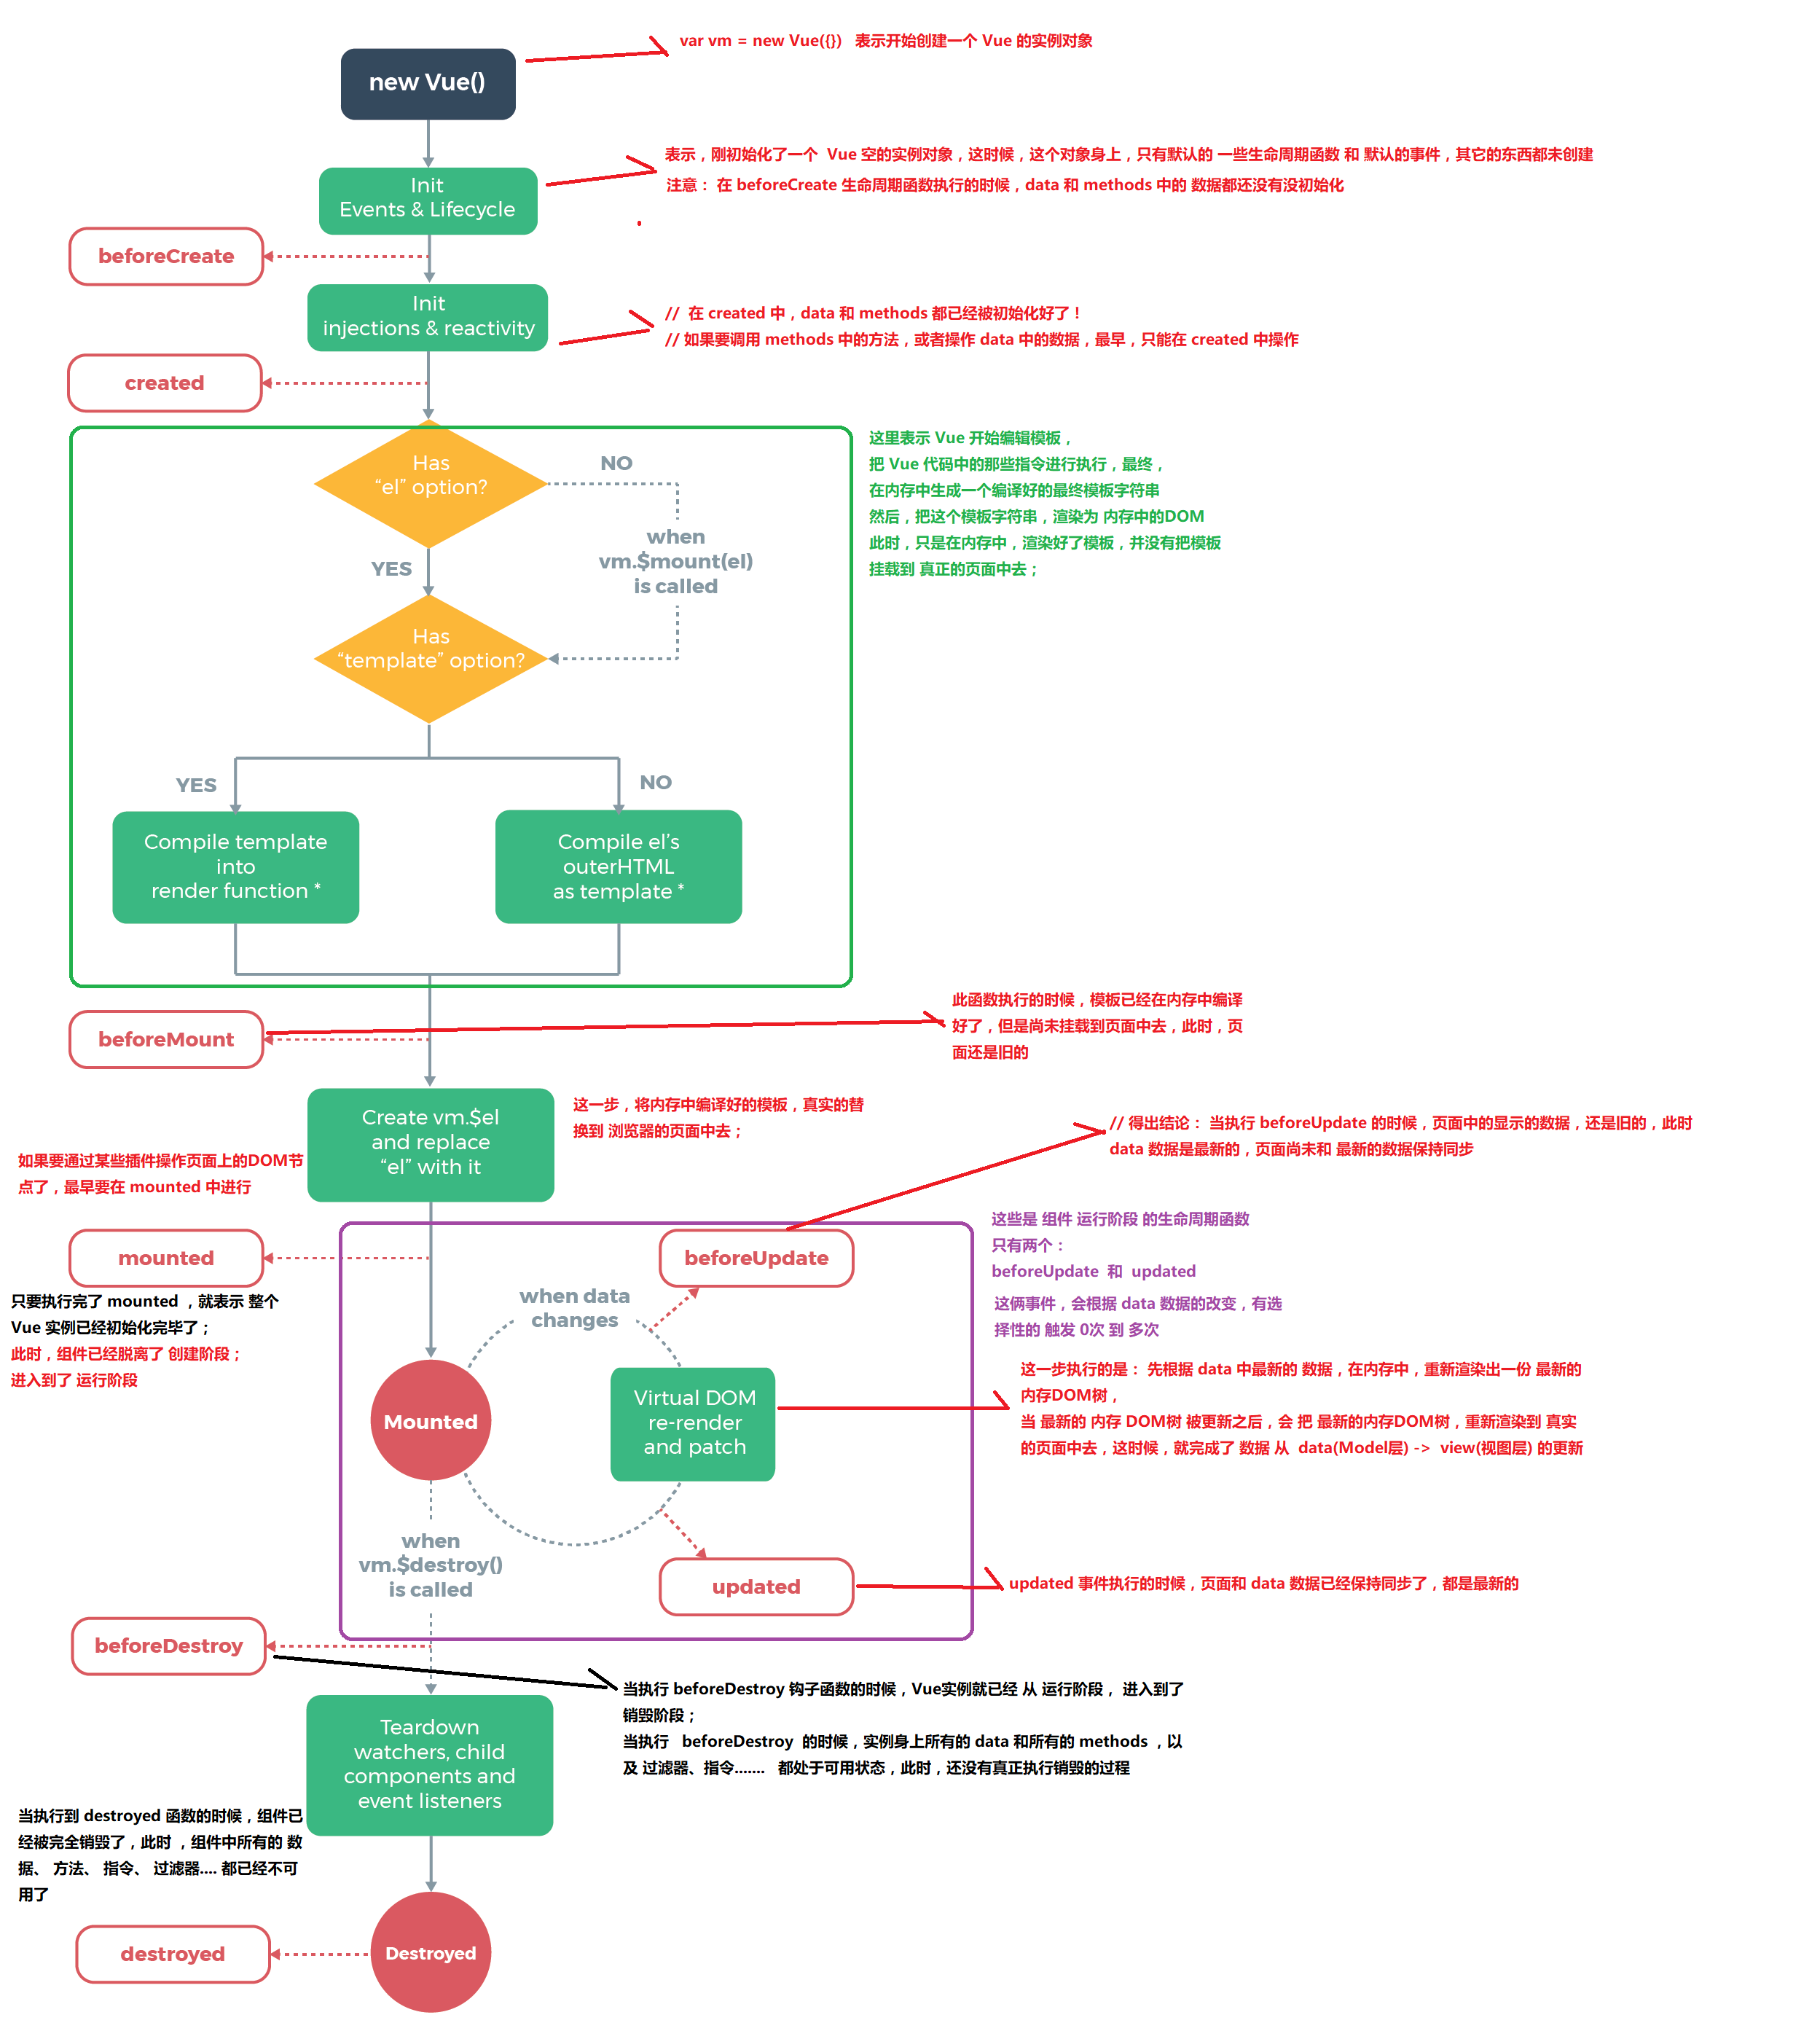
什么是生命周期:从Vue实例创建、运行、到销毁期间,总是伴随着各种各样的事件,这些事件,统称为生命周期!
生命周期钩子 :就是生命周期事件的别名而已;生命周期钩子 = 生命周期函数 = 生命周期事件
主要的生命周期函数分类:
创建期间的生命周期函数:
beforeCreate:实例刚在内存中被创建出来,此时,还没有初始化好 data 和 methods 属性
created:实例已经在内存中创建OK,此时 data 和 methods 已经创建OK,此时还没有开始 编译模板
beforeMount:此时已经完成了模板的编译,但是还没有挂载到页面中
mounted:此时,已经将编译好的模板,挂载到了页面指定的容器中显示
运行期间的生命周期函数:
beforeUpdate:状态更新之前执行此函数, 此时 data 中的状态值是最新的,但是界面上显示的 数据还是旧的,因为此时还没有开始重新渲染DOM节点
updated:实例更新完毕之后调用此函数,此时 data 中的状态值 和 界面上显示的数据,都已经完成了更新,界面已经被重新渲染好了!
beforeDestroy:实例销毁之前调用。在这一步,实例仍然完全可用。
destroyed:Vue 实例销毁后调用。调用后,Vue 实例指示的所有东西都会解绑定,所有的事件监听器会被移除,所有的子实例也会被销毁。
例子: <!DOCTYPE html > <html lang ="en" > <head > <meta charset ="UTF-8" > <meta name ="viewport" content ="width=device-width, initial-scale=1.0" > <meta http-equiv ="X-UA-Compatible" content ="ie=edge" > <title > Document</title > <script src ="./lib/vue-2.4.0.js" > </script > </head > <body > <div id ="app" > <input type ="button" value ="修改msg" @click ="msg='No'" > <h3 id ="h3" > {{ msg }}</h3 > </div > <script > var vm = new Vue({ el : '#app' , data : { msg : 'ok' }, methods : { show ( console .log('执行了show方法' ) } }, beforeCreate ( }, created ( }, beforeMount ( }, mounted ( }, beforeUpdate ( }, updated ( console .log('界面上元素的内容:' + document .getElementById('h3' ).innerText) console .log('data 中的 msg 数据是:' + this .msg) } }); </script > </body > </html >
除了 vue-resource 之外,还可以使用 axios 的第三方包实现实现数据的请求
之前的学习中,如何发起数据请求?
常见的数据请求类型? get post jsonp
测试的URL请求资源地址:
JSONP的实现原理
由于浏览器的安全性限制,不允许AJAX访问 协议不同、域名不同、端口号不同的 数据接口,浏览器认为这种访问不安全;
可以通过动态创建script标签的形式,把script标签的src属性,指向数据接口的地址,因为script标签不存在跨域限制,这种数据获取方式,称作JSONP(注意:根据JSONP的实现原理,知晓,JSONP只支持Get请求);
具体实现过程:
先在客户端定义一个回调方法,预定义对数据的操作;
再把这个回调方法的名称,通过URL传参的形式,提交到服务器的数据接口;
服务器数据接口组织好要发送给客户端的数据,再拿着客户端传递过来的回调方法名称,拼接出一个调用这个方法的字符串,发送给客户端去解析执行;
客户端拿到服务器返回的字符串之后,当作Script脚本去解析执行,这样就能够拿到JSONP的数据了;
带大家通过 Node.js ,来手动实现一个JSONP的请求例子;
const http = require ('http' )const urlModule = require ('url' )const server = http.createServer()server.on('request' , function (req, res ) const { pathname : url, query } = urlModule.parse(req.url, true ) if (url === '/getscript' ) { var data = { name : 'xjj' , age : 18 , gender : '女孩子' } var scriptStr = `${query.callback} (${JSON .stringify(data)} )` res.end(scriptStr) } else { res.end('404' ) } }) server.listen(3000 , function ( console .log('server listen at http://127.0.0.1:3000' ) })
vue-resource 的配置步骤:
直接在页面中,通过script标签,引入 vue-resource 的脚本文件;
注意:引用的先后顺序是:先引用 Vue 的脚本文件,再引用 vue-resource 的脚本文件;
发送get/post/JSONP请求:
<!DOCTYPE html>
<html lang="en">

<head>
  <meta charset="UTF-8">
  <meta name="viewport" content="width=device-width, initial-scale=1.0">
  <meta http-equiv="X-UA-Compatible" content="ie=edge">
  <title>Document</title>
  <script src="./lib/vue-2.4.0.js"></script>
  <!-- 注意:vue-resource 依赖于 Vue,所以先后顺序要注意  -->
  <!-- this.$http.jsonp -->
  <script src="./lib/vue-resource-1.3.4.js"></script>
</head>

<body>
  <div id="app">
    <input type="button" value="get请求" @click="getInfo">
    <input type="button" value="post请求" @click="postInfo">
    <input type="button" value="jsonp请求" @click="jsonpInfo">
  </div>

  <script>
    // 创建 Vue 实例,得到 ViewModel
    var vm = new Vue({
      el: '#app',
      data: {},
      methods: {
        getInfo() { // 发起get请求
          //  当发起get请求之后, 通过 .then 来设置成功的回调函数
          this.$http.get('http://vue.studyit.io/api/getlunbo').then(function (result) {
            // 通过 result.body 拿到服务器返回的成功的数据
            // console.log(result.body)
          })
        },
        postInfo() { // 发起 post 请求   application/x-wwww-form-urlencoded
          //  手动发起的 Post 请求,默认没有表单格式,所以,有的服务器处理不了
          //  通过 post 方法的第三个参数, { emulateJSON: true } 设置 提交的内容类型 为 普通表单数据格式
          this.$http.post('http://vue.studyit.io/api/post', {}, { emulateJSON: true }).then(result => {
            console.log(result.body)
          })
        },
        jsonpInfo() { // 发起JSONP 请求
          this.$http.jsonp('http://vue.studyit.io/api/jsonp').then(result => {
            console.log(result.body)
          })
        }
      }
    });
  </script>
</body>

</html>
客户端JSONP页面
<!DOCTYPE html > <html lang ="en" > <head > <meta charset ="UTF-8" > <meta name ="viewport" content ="width=device-width, initial-scale=1.0" > <meta http-equiv ="X-UA-Compatible" content ="ie=edge" > <title > Document</title > </head > <body > <script > function showInfo123 (data ) console .log(data) } </script > <script src ="http://127.0.0.1:3000/getscript?callback=showInfo123" > </script > </body > </html >
配置本地数据库和数据接口API
先解压安装 PHPStudy;
解压安装 Navicat 这个数据库可视化工具,并激活;
打开 Navicat 工具,新建空白数据库,名为 dtcmsdb4;
双击新建的数据库,连接上这个空白数据库,在新建的数据库上右键 -> 运行SQL文件,选择并执行 dtcmsdb4.sql 这个数据库脚本文件;如果执行不报错,则数据库导入完成;
进入文件夹 vuecms3_nodejsapi 内部,执行 npm i 安装所有的依赖项;
先确保本机安装了 nodemon, 没有安装,则运行 npm i nodemon -g 进行全局安装,安装完毕后,进入到 vuecms3_nodejsapi目录 -> src目录 -> 双击运行 start.bat
如果API启动失败,请检查 PHPStudy 是否正常开启,同时,检查 app.js 中第 14行 中数据库连接配置字符串是否正确;PHPStudy 中默认的 用户名是root,默认的密码也是root
为什么要有动画:动画能够提高用户的体验,帮助用户更好的理解页面中的功能;
不使用动画
<!DOCTYPE html > <html lang ="en" > <head > <meta charset ="UTF-8" > <meta name ="viewport" content ="width=device-width, initial-scale=1.0" > <meta http-equiv ="X-UA-Compatible" content ="ie=edge" > <title > Document</title > <script src ="./lib/vue-2.4.0.js" > </script > </head > <body > <div id ="app" > <input type ="button" value ="toggle" @click ="flag=!flag" > <h3 v-if ="flag" > 这是一个H3</h3 > </div > <script > var vm = new Vue({ el : '#app' , data : { flag : false }, methods : {} }); </script > </body > </html >
使用过渡类名 <!DOCTYPE html > <html lang ="en" > <head > <meta charset ="UTF-8" > <meta name ="viewport" content ="width=device-width, initial-scale=1.0" > <meta http-equiv ="X-UA-Compatible" content ="ie=edge" > <title > Document</title > <script src ="./lib/vue-2.4.0.js" > </script > <style > .v-enter , .v-leave-to { opacity : 0 ; transform : translateX (150px ); } .v-enter-active , .v-leave-active { transition : all 0.8s ease; } </style > </head > <body > <div id ="app" > <input type ="button" value ="toggle" @click ="flag=!flag" > <transition > <h3 v-if ="flag" > 这是一个H3</h3 > </transition > </div > <script > var vm = new Vue({ el : '#app' , data : { flag : false }, methods : {} }); </script > </body > </html >
动画-修改v-前缀 <!DOCTYPE html > <html lang ="en" > <head > <meta charset ="UTF-8" > <meta name ="viewport" content ="width=device-width, initial-scale=1.0" > <meta http-equiv ="X-UA-Compatible" content ="ie=edge" > <title > Document</title > <script src ="./lib/vue-2.4.0.js" > </script > <style > .v-enter , .v-leave-to { opacity : 0 ; transform : translateX (150px ); } .v-enter-active , .v-leave-active { transition : all 0.8s ease; } .my-enter , .my-leave-to { opacity : 0 ; transform : translateY (70px ); } .my-enter-active , .my-leave-active { transition : all 0.8s ease; } </style > </head > <body > <div id ="app" > <input type ="button" value ="toggle" @click ="flag=!flag" > <transition > <h3 v-if ="flag" > 这是一个H3</h3 > </transition > <hr > <input type ="button" value ="toggle2" @click ="flag2=!flag2" > <transition name ="my" > <h6 v-if ="flag2" > 这是一个H6</h6 > </transition > </div > <script > var vm = new Vue({ el : '#app' , data : { flag : false , flag2 : false }, methods : {} }); </script > </body > </html >
<!DOCTYPE html > <html lang ="en" > <head > <meta charset ="UTF-8" > <meta name ="viewport" content ="width=device-width, initial-scale=1.0" > <meta http-equiv ="X-UA-Compatible" content ="ie=edge" > <title > Document</title > <script src ="./lib/vue-2.4.0.js" > </script > <link rel ="stylesheet" href ="./lib/animate.css" > </head > <body > <div id ="app" > <input type ="button" value ="toggle" @click ="flag=!flag" > <transition enter-active-class ="bounceIn" leave-active-class ="bounceOut" :duration ="{ enter: 200, leave: 400 }" > <h3 v-if ="flag" class ="animated" > 这是一个H3</h3 > </transition > </div > <script > var vm = new Vue({ el : '#app' , data : { flag : false }, methods : {} }); </script > </body > </html >
动画-使用钩子函数模拟小球半场动画 <!DOCTYPE html > <html lang ="en" > <head > <meta charset ="UTF-8" > <meta name ="viewport" content ="width=device-width, initial-scale=1.0" > <meta http-equiv ="X-UA-Compatible" content ="ie=edge" > <title > Document</title > <script src ="./lib/vue-2.4.0.js" > </script > <style > .ball { width : 15px ; height : 15px ; border-radius : 50% ; background-color : red; } </style > </head > <body > <div id ="app" > <input type ="button" value ="快到碗里来" @click ="flag=!flag" > <transition @before-enter ="beforeEnter" @enter ="enter" @after-enter ="afterEnter" > <div class ="ball" v-show ="flag" > </div > </transition > </div > <script > var vm = new Vue({ el : '#app' , data : { flag : false }, methods : { beforeEnter (el ) el.style.transform = "translate(0, 0)" }, enter (el, done ) el.offsetWidth el.style.transform = "translate(150px, 450px)" el.style.transition = 'all 1s ease' done() }, afterEnter (el ) this .flag = !this .flag } } }); </script > </body > </html >
<!DOCTYPE html > <html lang ="en" > <head > <meta charset ="UTF-8" > <meta name ="viewport" content ="width=device-width, initial-scale=1.0" > <meta http-equiv ="X-UA-Compatible" content ="ie=edge" > <title > Document</title > <script src ="./lib/vue-2.4.0.js" > </script > <style > li { border : 1px dashed #999 ; margin : 5px ; line-height : 35px ; padding-left : 5px ; font-size : 12px ; width : 100% ; } li :hover { background-color : hotpink; transition : all 0.8s ease; } .v-enter , .v-leave-to { opacity : 0 ; transform : translateY (80px ); } .v-enter-active , .v-leave-active { transition : all 0.6s ease; } .v-move { transition : all 0.6s ease; } .v-leave-active { position : absolute; } </style > </head > <body > <div id ="app" > <div > <label > Id: <input type ="text" v-model ="id" > </label > <label > Name: <input type ="text" v-model ="name" > </label > <input type ="button" value ="添加" @click ="add" > </div > <transition-group appear tag ="ul" > <li v-for ="(item, i) in list" :key ="item.id" @click ="del(i)" > {{item.id}} --- {{item.name}} </li > </transition-group > </div > <script > var vm = new Vue({ el : '#app' , data : { id : '' , name : '' , list : [ { id : 1 , name : '赵高' }, { id : 2 , name : '秦桧' }, { id : 3 , name : '严嵩' }, { id : 4 , name : '魏忠贤' } ] }, methods : { add ( this .list.push({ id : this .id, name : this .name }) this .id = this .name = '' }, del (i ) this .list.splice(i, 1 ) } } }); </script > </body > </html >
列表的排序过渡 <transition-group> 组件还有一个特殊之处。不仅可以进入和离开动画,还可以改变定位 。要使用这个新功能只需了解新增的 v-move 特性,它会在元素的改变定位的过程中应用 。
v-move 和 v-leave-active 结合使用,能够让列表的过渡更加平缓柔和:
.v-move{
  transition: all 0.8s ease;
}
.v-leave-active{
  position: absolute;
}
定义Vue组件 什么是组件: 组件的出现,就是为了拆分Vue实例的代码量的,能够让我们以不同的组件,来划分不同的功能模块,将来我们需要什么样的功能,就可以去调用对应的组件即可;
模块化: 是从代码逻辑的角度进行划分的;方便代码分层开发,保证每个功能模块的职能单一;
组件化: 是从UI界面的角度进行划分的;前端的组件化,方便UI组件的重用;
全局组件定义的三种方式
使用 Vue.extend 配合 Vue.component 方法:
<!DOCTYPE html > <html lang ="en" > <head > <meta charset ="UTF-8" > <meta name ="viewport" content ="width=device-width, initial-scale=1.0" > <meta http-equiv ="X-UA-Compatible" content ="ie=edge" > <title > Document</title > <script src ="./lib/vue-2.4.0.js" > </script > </head > <body > <div id ="app" > <mycom1 > </mycom1 > </div > <script > Vue.component('mycom1' , Vue.extend({ template : '<h3>这是使用 Vue.extend 创建的组件</h3>' })) var vm = new Vue({ el : '#app' , data : {}, methods : {} }); </script > </body > </html >
2.直接使用 Vue.component 方法:
<!DOCTYPE html > <html lang ="en" > <head > <meta charset ="UTF-8" > <meta name ="viewport" content ="width=device-width, initial-scale=1.0" > <meta http-equiv ="X-UA-Compatible" content ="ie=edge" > <title > Document</title > <script src ="./lib/vue-2.4.0.js" > </script > </head > <body > <div id ="app" > <mycom2 > </mycom2 > </div > <script > Vue.component('mycom2' , { template : '<div><h3>这是直接使用 Vue.component 创建出来的组件</h3><span>123</span></div>' }) var vm = new Vue({ el : '#app' , data : {}, methods : {} }); </script > </body > </html >
3.将模板字符串,定义到script标签种:
<!DOCTYPE html > <html lang ="en" > <head > <meta charset ="UTF-8" > <meta name ="viewport" content ="width=device-width, initial-scale=1.0" > <meta http-equiv ="X-UA-Compatible" content ="ie=edge" > <title > Document</title > <script src ="./lib/vue-2.4.0.js" > </script > </head > <body > <div id ="app" > <mycom3 > </mycom3 > </div > <div id ="app2" > <mycom3 > </mycom3 > <login > </login > </div > <template id ="tmpl" > <div > <h1 > 这是通过 template 元素,在外部定义的组件结构,这个方式,有代码的只能提示和高亮</h1 > <h4 > 好用,不错!</h4 > </div > </template > <template id ="tmpl2" > <h1 > 这是私有的 login 组件</h1 > </template > <script > Vue.component('mycom3' , { template : '#tmpl' }) var vm = new Vue({ el : '#app' , data : {}, methods : {} }); var vm2 = new Vue({ el : '#app2' , data : {}, methods : {}, filters : {}, directives : {}, components : { login : { template : '#tmpl2' } }, beforeCreate ( created ( beforeMount ( mounted ( beforeUpdate ( updated ( beforeDestroy ( destroyed ( }) </script > </body > </html >
注意: 组件中的DOM结构,有且只能有唯一的根元素(Root Element)来进行包裹!
组件中展示数据和响应事件 在组件中,data需要被定义为一个方法
在子组件中,如果将模板字符串,定义到了script标签中,那么,要访问子组件身上的data属性中的值,需要使用this来访问;
<!DOCTYPE html > <html lang ="en" > <head > <meta charset ="UTF-8" > <meta name ="viewport" content ="width=device-width, initial-scale=1.0" > <meta http-equiv ="X-UA-Compatible" content ="ie=edge" > <title > Document</title > <script src ="./lib/vue-2.4.0.js" > </script > </head > <body > <div id ="app" > <mycom1 > </mycom1 > </div > <script > Vue.component('mycom1' , { template : '<h1>这是全局组件 --- {{msg}}</h1>' , data : function ( return { msg : '这是组件的中data定义的数据' } } }) var vm = new Vue({ el : '#app' , data : {}, methods : {} }); </script > </body > </html >
为什么组件中的data属性必须定义为一个方法并返回一个对象 <!DOCTYPE html > <html lang ="en" > <head > <meta charset ="UTF-8" > <meta name ="viewport" content ="width=device-width, initial-scale=1.0" > <meta http-equiv ="X-UA-Compatible" content ="ie=edge" > <title > Document</title > <script src ="./lib/vue-2.4.0.js" > </script > </head > <body > <div id ="app" > <counter > </counter > <hr > <counter > </counter > <hr > <counter > </counter > </div > <template id ="tmpl" > <div > <input type ="button" value ="+1" @click ="increment" > <h3 > {{count}}</h3 > </div > </template > <script > var dataObj = { count : 0 } Vue.component('counter' , { template : '#tmpl' , data : function ( return { count : 0 } }, methods : { increment ( this .count++ } } }) var vm = new Vue({ el : '#app' , data : {}, methods : {} }); </script > </body > </html >
使用components属性定义局部子组件 组件实例定义方式:
<script > var vm = new Vue({ el : '#app' , data : {}, methods : {}, components : { account : { template : '<div><h1>这是Account组件{{name}}</h1><login></login></div>' , components : { login : { template : "<h3>这是登录组件</h3>" } } } } }); </script >
引用组件:
<div id="app" > <account></account> </div>
使用flag标识符结合v-if和v-else切换组件 <!DOCTYPE html > <html lang ="en" > <head > <meta charset ="UTF-8" > <meta name ="viewport" content ="width=device-width, initial-scale=1.0" > <meta http-equiv ="X-UA-Compatible" content ="ie=edge" > <title > Document</title > <script src ="./lib/vue-2.4.0.js" > </script > </head > <body > <div id ="app" > <a href ="" @click.prevent ="flag=true" > 登录</a > <a href ="" @click.prevent ="flag=false" > 注册</a > <login v-if ="flag" > </login > <register v-else ="flag" > </register > </div > <script > Vue.component('login' , { template : '<h3>登录组件</h3>' }) Vue.component('register' , { template : '<h3>注册组件</h3>' }) var vm = new Vue({ el : '#app' , data : { flag : false }, methods : {} }); </script > </body > </html >
使用:is属性来切换不同的子组件,并添加切换动画 <!DOCTYPE html > <html lang ="en" > <head > <meta charset ="UTF-8" > <meta name ="viewport" content ="width=device-width, initial-scale=1.0" > <meta http-equiv ="X-UA-Compatible" content ="ie=edge" > <title > Document</title > <script src ="./lib/vue-2.4.0.js" > </script > <style > .v-enter , .v-leave-to { opacity : 0 ; transform : translateX (150px ); } .v-enter-active , .v-leave-active { transition : all 0.5s ease; } </style > </head > <body > <div id ="app" > <a href ="" @click.prevent ="comName='login'" > 登录</a > <a href ="" @click.prevent ="comName='register'" > 注册</a > <transition mode ="out-in" > <component :is ="comName" > </component > </transition > </div > <script > Vue.component('login' , { template : '<h3>登录组件</h3>' }) Vue.component('register' , { template : '<h3>注册组件</h3>' }) var vm = new Vue({ el : '#app' , data : { comName : 'login' }, methods : {} }); </script > </body > </html >
父组件向子组件传值 组件实例定义方式,注意:一定要使用props属性来定义父组件传递过来的数据
使用v-bind或简化指令,将数据传递到子组件中:
<!DOCTYPE html > <html lang ="en" > <head > <meta charset ="UTF-8" > <meta name ="viewport" content ="width=device-width, initial-scale=1.0" > <meta http-equiv ="X-UA-Compatible" content ="ie=edge" > <title > Document</title > <script src ="./lib/vue-2.4.0.js" > </script > </head > <body > <div id ="app" > <com1 v-bind:parentmsg ="msg" > </com1 > </div > <script > var vm = new Vue({ el : '#app' , data : { msg : '123 啊-父组件中的数据' }, methods : {}, components : { com1 : { data ( return { title : '123' , content : 'qqq' } }, template : '<h1 @click="change">这是子组件 --- {{ parentmsg }}</h1>' , props : ['parentmsg' ], directives : {}, filters : {}, components : {}, methods : { change ( this .parentmsg = '被修改了' } } } } }); </script > </body > </html >
子组件向父组件传值
原理:父组件将方法的引用,传递到子组件内部,子组件在内部调用父组件传递过来的方法,同时把要发送给父组件的数据,在调用方法的时候当作参数传递进去;
父组件将方法的引用传递给子组件,其中,getMsg是父组件中methods中定义的方法名称,func是子组件调用传递过来方法时候的方法名称
<son @func="getMsg"></son>
3.子组件内部通过this.$emit('方法名', 要传递的数据)方式,来调用父组件中的方法,同时把数据传递给父组件使用
<!DOCTYPE html > <html lang ="en" > <head > <meta charset ="UTF-8" > <meta name ="viewport" content ="width=device-width, initial-scale=1.0" > <meta http-equiv ="X-UA-Compatible" content ="ie=edge" > <title > Document</title > <script src ="./lib/vue-2.4.0.js" > </script > </head > <body > <div id ="app" > <com2 @func ="show" > </com2 > </div > <template id ="tmpl" > <div > <h1 > 这是 子组件</h1 > <input type ="button" value ="这是子组件中的按钮 - 点击它,触发 父组件传递过来的 func 方法" @click ="myclick" > </div > </template > <script > var com2 = { template : '#tmpl' , data ( return { sonmsg : { name : '小头儿子' , age : 6 } } }, methods : { myclick ( this .$emit('func' , this .sonmsg) } } } var vm = new Vue({ el : '#app' , data : { datamsgFormSon : null }, methods : { show (data ) this .datamsgFormSon = data } }, components : { com2 } }); </script > </body > </html >
评论列表案例 <!DOCTYPE html > <html lang ="en" > <head > <meta charset ="UTF-8" > <meta name ="viewport" content ="width=device-width, initial-scale=1.0" > <meta http-equiv ="X-UA-Compatible" content ="ie=edge" > <title > Document</title > <script src ="./lib/vue-2.4.0.js" > </script > <link rel ="stylesheet" href ="./lib/bootstrap-3.3.7.css" > </head > <body > <div id ="app" > <cmt-box @func ="loadComments" > </cmt-box > <ul class ="list-group" > <li class ="list-group-item" v-for ="item in list" :key ="item.id" > <span class ="badge" > 评论人: {{ item.user }}</span > {{ item.content }} </li > </ul > </div > <template id ="tmpl" > <div > <div class ="form-group" > <label > 评论人:</label > <input type ="text" class ="form-control" v-model ="user" > </div > <div class ="form-group" > <label > 评论内容:</label > <textarea class ="form-control" v-model ="content" > </textarea > </div > <div class ="form-group" > <input type ="button" value ="发表评论" class ="btn btn-primary" @click ="postComment" > </div > </div > </template > <script > var commentBox = { data ( return { user : '' , content : '' } }, template : '#tmpl' , methods : { postComment ( var comment = { id : Date .now(), user : this .user, content : this .content } var list = JSON .parse(localStorage .getItem('cmts' ) || '[]' ) list.unshift(comment) localStorage .setItem('cmts' , JSON .stringify(list)) this .user = this .content = '' this .$emit('func' ) } } } var vm = new Vue({ el : '#app' , data : { list : [ { id : Date .now(), user : '李白' , content : '天生我材必有用' }, { id : Date .now(), user : '江小白' , content : '劝君更尽一杯酒' }, { id : Date .now(), user : '小马' , content : '我姓马, 风吹草低见牛羊的马' } ] }, beforeCreate ( }, created ( this .loadComments() }, methods : { loadComments ( var list = JSON .parse(localStorage .getItem('cmts' ) || '[]' ) this .list = list } }, components : { 'cmt-box' : commentBox } }); </script > </body > </html >
使用 this.$refs 来获取元素和组件
<!DOCTYPE html > <html lang ="en" > <head > <meta charset ="UTF-8" > <meta name ="viewport" content ="width=device-width, initial-scale=1.0" > <meta http-equiv ="X-UA-Compatible" content ="ie=edge" > <title > Document</title > <script src ="./lib/vue-2.4.0.js" > </script > </head > <body > <div id ="app" > <input type ="button" value ="获取元素" @click ="getElement" ref ="mybtn" > <h3 id ="myh3" ref ="myh3" > 哈哈哈, 今天天气太好了!!!</h3 > <hr > <login ref ="mylogin" > </login > </div > <script > var login = { template : '<h1>登录组件</h1>' , data ( return { msg : 'son msg' } }, methods : { show ( console .log('调用了子组件的方法' ) } } } var vm = new Vue({ el : '#app' , data : {}, methods : { getElement ( } }, components : { login } }); </script > </body > </html >
什么是路由
对于普通的网站,所有的超链接都是URL地址,所有的URL地址都对应服务器上对应的资源;
对于单页面应用程序来说,主要通过URL中的hash(#号)来实现不同页面之间的切换,同时,hash有一个特点:HTTP请求中不会包含hash相关的内容;所以,单页面程序中的页面跳转主要用hash实现;
在单页面应用程序中,这种通过hash改变来切换页面的方式,称作前端路由(区别于后端路由);
在 vue 中使用 vue-router
导入 vue-router 组件类库:
使用 router-link 组件来导航
使用 router-view 组件来显示匹配到的组件
创建使用Vue.extend创建组件
创建一个路由 router 实例,通过 routers 属性来定义路由匹配规则
使用 router 属性来使用路由规则
<!DOCTYPE html > <html lang ="en" > <head > <meta charset ="UTF-8" > <meta name ="viewport" content ="width=device-width, initial-scale=1.0" > <meta http-equiv ="X-UA-Compatible" content ="ie=edge" > <title > Document</title > <script src ="./lib/vue-2.4.0.js" > </script > <script src ="./lib/vue-router-3.0.1.js" > </script > <style > .router-link-active , .myactive { color : red; font-weight : 800 ; font-style : italic; font-size : 80px ; text-decoration : underline; background-color : green; } .v-enter , .v-leave-to { opacity : 0 ; transform : translateX (140px ); } .v-enter-active , .v-leave-active { transition : all 0.5s ease; } </style > </head > <body > <div id ="app" > <router-link to ="/login" tag ="span" > 登录</router-link > <router-link to ="/register" > 注册</router-link > <transition mode ="out-in" > <router-view > </router-view > </transition > </div > <script > var login = { template : '<h1>登录组件</h1>' } var register = { template : '<h1>注册组件</h1>' } var routerObj = new VueRouter({ routes : [ { path : '/' , redirect : '/login' }, { path : '/login' , component : login }, { path : '/register' , component : register } ], linkActiveClass : 'myactive' }) var vm = new Vue({ el : '#app' , data : {}, methods : {}, router : routerObj }); </script > </body > </html >
在路由规则中定义参数 在规则中定义参数:
通过 this.$route.params来获取路由中的参数:
<!DOCTYPE html > <html lang ="en" > <head > <meta charset ="UTF-8" > <meta name ="viewport" content ="width=device-width, initial-scale=1.0" > <meta http-equiv ="X-UA-Compatible" content ="ie=edge" > <title > Document</title > <script src ="./lib/vue-2.4.0.js" > </script > <script src ="./lib/vue-router-3.0.1.js" > </script > </head > <body > <div id ="app" > <router-link to ="/login?id=10&name=zs" > 登录</router-link > <router-link to ="/register" > 注册</router-link > <router-view > </router-view > </div > <script > var login = { template : '<h1>登录 --- {{ $route.query.id }} --- {{ $route.query.name }}</h1>' , data ( return { msg : '123' } }, created ( } } var register = { template : '<h1>注册</h1>' } var router = new VueRouter({ routes : [ { path : '/login' , component : login }, { path : '/register' , component : register } ] }) var vm = new Vue({ el : '#app' , data : {}, methods : {}, router }); </script > </body > </html >
<!DOCTYPE html > <html lang ="en" > <head > <meta charset ="UTF-8" > <meta name ="viewport" content ="width=device-width, initial-scale=1.0" > <meta http-equiv ="X-UA-Compatible" content ="ie=edge" > <title > Document</title > <script src ="./lib/vue-2.4.0.js" > </script > <script src ="./lib/vue-router-3.0.1.js" > </script > </head > <body > <div id ="app" > <router-link to ="/login/12/ls" > 登录</router-link > <router-link to ="/register" > 注册</router-link > <router-view > </router-view > </div > <script > var login = { template : '<h1>登录 --- {{ $route.params.id }} --- {{ $route.params.name }}</h1>' , data ( return { msg : '123' } }, created ( console .log(this .$route.params.id) } } var register = { template : '<h1>注册</h1>' } var router = new VueRouter({ routes : [ { path : '/login/:id/:name' , component : login }, { path : '/register' , component : register } ] }) var vm = new Vue({ el : '#app' , data : {}, methods : {}, router }); </script > </body > </html >
使用 children 属性实现路由嵌套 <!DOCTYPE html > <html lang ="en" > <head > <meta charset ="UTF-8" > <meta name ="viewport" content ="width=device-width, initial-scale=1.0" > <meta http-equiv ="X-UA-Compatible" content ="ie=edge" > <title > Document</title > <script src ="./lib/vue-2.4.0.js" > </script > <script src ="./lib/vue-router-3.0.1.js" > </script > </head > <body > <div id ="app" > <router-link to ="/account" > Account</router-link > <router-view > </router-view > </div > <template id ="tmpl" > <div > <h1 > 这是 Account 组件</h1 > <router-link to ="/account/login" > 登录</router-link > <router-link to ="/account/register" > 注册</router-link > <router-view > </router-view > </div > </template > <script > var account = { template : '#tmpl' } var login = { template : '<h3>登录</h3>' } var register = { template : '<h3>注册</h3>' } var router = new VueRouter({ routes : [ { path : '/account' , component : account, children : [ { path : 'login' , component : login }, { path : 'register' , component : register } ] } ] }) var vm = new Vue({ el : '#app' , data : {}, methods : {}, router }); </script > </body > </html >
命名视图实现经典布局 <!DOCTYPE html > <html lang ="en" > <head > <meta charset ="UTF-8" > <meta name ="viewport" content ="width=device-width, initial-scale=1.0" > <meta http-equiv ="X-UA-Compatible" content ="ie=edge" > <title > Document</title > <script src ="./lib/vue-2.4.0.js" > </script > <script src ="./lib/vue-router-3.0.1.js" > </script > <style > html , body { margin : 0 ; padding : 0 ; } .header { background-color : orange; height : 80px ; } h1 { margin : 0 ; padding : 0 ; font-size : 16px ; } .container { display : flex; height : 600px ; } .left { background-color : lightgreen; flex : 2 ; } .main { background-color : lightpink; flex : 8 ; } </style > </head > <body > <div id ="app" > <router-view > </router-view > <div class ="container" > <router-view name ="left" > </router-view > <router-view name ="main" > </router-view > </div > </div > <script > var header = { template : '<h1 class="header">Header头部区域</h1>' } var leftBox = { template : '<h1 class="left">Left侧边栏区域</h1>' } var mainBox = { template : '<h1 class="main">mainBox主体区域</h1>' } var router = new VueRouter({ routes : [ { path : '/' , components : { 'default' : header, 'left' : leftBox, 'main' : mainBox } } ] }) var vm = new Vue({ el : '#app' , data : {}, methods : {}, router }); </script > </body > </html >
watch属性的使用考虑一个问题:想要实现 名 和 姓 两个文本框的内容改变,则全名的文本框中的值也跟着改变;(用以前的知识如何实现???)
<!DOCTYPE html > <html lang ="en" > <head > <meta charset ="UTF-8" > <meta name ="viewport" content ="width=device-width, initial-scale=1.0" > <meta http-equiv ="X-UA-Compatible" content ="ie=edge" > <title > Document</title > <script src ="./lib/vue-2.4.0.js" > </script > <script src ="./lib/vue-router-3.0.1.js" > </script > </head > <body > <div id ="app" > <router-link to ="/login" > 登录</router-link > <router-link to ="/register" > 注册</router-link > <router-view > </router-view > </div > <script > var login = { template : '<h3>这是登录子组件,这个组件是 奔波霸 开发的。</h3>' } var register = { template : '<h3>这是注册子组件,这个组件是 霸波奔 开发的。</h3>' } var router = new VueRouter({ routes : [ { path : '/' , redirect : '/login' }, { path : '/login' , component : login }, { path : '/register' , component : register } ], linkActiveClass : 'myactive' }) var vm = new Vue({ el : '#app' , data : {}, methods : {}, router, watch : { '$route.path' : function (newVal, oldVal ) if (newVal === '/login' ) { console .log('欢迎进入登录页面' ) } else if (newVal === '/register' ) { console .log('欢迎进入注册页面' ) } } } }); </script > </body > </html >
computed计算属性的使用<!DOCTYPE html> <html lang="en" > <head> <meta charset="UTF-8" > <meta name="viewport" content="width=device-width, initial-scale=1.0" > <meta http-equiv="X-UA-Compatible" content="ie=edge" > <title>Document</title> <script src="./lib/vue-2.4.0.js" ></script> </head> <body> <div id="app" > <input type="text" v-model="firstname" > + <input type="text" v-model="middlename" > + <input type="text" v-model="lastname" > = <input type="text" v-model="fullname" > <p>{{ fullname }}</p> <p>{{ fullname }}</p> <p>{{ fullname }}</p> </div> <script> var vm = new Vue({ el: '#app' , data: { firstname: '' , lastname: '' , middlename: '' }, methods: {}, computed: { 'fullname' : function () { console.log('ok' ) return this .firstname + '-' + this .middlename + '-' + this .lastname } } }); </script> </body> </html>
watch、computed和methods之间的对比
computed属性的结果会被缓存,除非依赖的响应式属性变化才会重新计算。主要当作属性来使用;methods方法表示一个具体的操作,主要书写业务逻辑;watch一个对象,键是需要观察的表达式,值是对应回调函数。主要用来监听某些特定数据的变化,从而进行某些具体的业务逻辑操作;可以看作是computed和methods的结合体;
nrm的安装使用作用:提供了一些最常用的NPM包镜像地址,能够让我们快速的切换安装包时候的服务器地址;
运行npm i nrm -g全局安装nrm包;
使用nrm ls查看当前所有可用的镜像源地址以及当前所使用的镜像源地址;
使用nrm use npm或nrm use taobao切换不同的镜像源地址;
在网页中会引用哪些常见的静态资源?
.js .jsx .coffee .ts(TypeScript 类 C# 语言)
.svg .ttf .eot .woff .woff2
.ejs .jade .vue【这是在webpack中定义组件的方式,推荐这么用】
网页中引入的静态资源多了以后有什么问题???
网页加载速度慢, 因为 我们要发起很多的二次请求;
要处理错综复杂的依赖关系
如何解决上述两个问题
合并、压缩、精灵图、图片的Base64编码
可以使用之前学过的requireJS、也可以使用webpack可以解决各个包之间的复杂依赖关系;
什么是webpack? webpack 是前端的一个项目构建工具,它是基于 Node.js 开发出来的一个前端工具;
如何完美实现上述的2种解决方案
使用Gulp, 是基于 task 任务的;
使用Webpack, 是基于整个项目进行构建的;
借助于webpack这个前端自动化构建工具,可以完美实现资源的合并、打包、压缩、混淆等诸多功能。
根据官网的图片介绍webpack打包的过程
webpack官网
webpack安装的两种方式
运行npm i webpack -g全局安装webpack,这样就能在全局使用webpack的命令
在项目根目录中运行npm i webpack --save-dev安装到项目依赖中
初步使用webpack打包构建列表隔行变色案例
运行npm init初始化项目,使用npm管理项目中的依赖包
创建项目基本的目录结构
使用cnpm i jquery --save安装jquery类库
创建main.js并书写各行变色的代码逻辑:
import $ from 'jquery' $('#list li:even' ).css('backgroundColor' ,'lightblue' ); $('#list li:odd' ).css('backgroundColor' ,'pink' );
直接在页面上引用main.js会报错,因为浏览器不认识import这种高级的JS语法,需要使用webpack进行处理,webpack默认会把这种高级的语法转换为低级的浏览器能识别的语法;
运行webpack 入口文件路径 输出文件路径对main.js进行处理:
webpack src/js/main.js dist/bundle.js
使用webpack的配置文件简化打包时候的命令
在项目根目录中创建webpack.config.js
由于运行webpack命令的时候,webpack需要指定入口文件和输出文件的路径,所以,我们需要在webpack.config.js中配置这两个路径:
var path = require ('path' );module .exports = { entry : path.resolve(__dirname, 'src/js/main.js' ), output : { path : path.resolve(__dirname, 'dist' ), filename : 'bundle.js' } }
实现webpack的实时打包构建
由于每次重新修改代码之后,都需要手动运行webpack打包的命令,比较麻烦,所以使用webpack-dev-server来实现代码实时打包编译,当修改代码之后,会自动进行打包构建。
运行cnpm i webpack-dev-server --save-dev安装到开发依赖
安装完成之后,在命令行直接运行webpack-dev-server来进行打包,发现报错,此时需要借助于package.json文件中的指令,来进行运行webpack-dev-server命令,在scripts节点下新增"dev": "webpack-dev-server"指令,发现可以进行实时打包,但是dist目录下并没有生成bundle.js文件,这是因为webpack-dev-server将打包好的文件放在了内存中
把bundle.js放在内存中的好处是:由于需要实时打包编译,所以放在内存中速度会非常快
这个时候访问webpack-dev-server启动的http://localhost:8080/网站,发现是一个文件夹的面板,需要点击到src目录下,才能打开我们的index首页,此时引用不到bundle.js文件,需要修改index.html中script的src属性为:<script src="../bundle.js"></script>
为了能在访问http://localhost:8080/的时候直接访问到index首页,可以使用--contentBase src指令来修改dev指令,指定启动的根目录:
"dev": "webpack-dev-server --contentBase src"
同时修改index页面中script的src属性为<script src="bundle.js"></script>
使用html-webpack-plugin插件配置启动页面 由于使用--contentBase指令的过程比较繁琐,需要指定启动的目录,同时还需要修改index.html中script标签的src属性,所以推荐大家使用html-webpack-plugin插件配置启动页面.
运行cnpm i html-webpack-plugin --save-dev安装到开发依赖
修改webpack.config.js配置文件如下:
var path = require ('path' ); var htmlWebpackPlugin = require ('html-webpack-plugin' ); module .exports = { entry : path.resolve(__dirname, 'src/js/main.js' ), output : { path : path.resolve(__dirname, 'dist' ), filename : 'bundle.js' }, plugins :[ new htmlWebpackPlugin({ template :path.resolve(__dirname, 'src/index.html' ), filename :'index.html' }) ] }
3.修改package.json中script节点中的dev指令如下:
"dev": "webpack-dev-server"
4.将index.html中script标签注释掉,因为html-webpack-plugin插件会自动把bundle.js注入到index.html页面中!
实现自动打开浏览器、热更新和配置浏览器的默认端口号 注意:热更新在JS中表现的不明显,可以从一会儿要讲到的CSS身上进行介绍说明!
方式1:
修改package.json的script节点如下,其中--open表示自动打开浏览器,--port 4321表示打开的端口号为4321,--hot表示启用浏览器热更新:
"dev": "webpack-dev-server --hot --port 4321 --open"
方式2:
修改webpack.config.js文件,新增devServer节点如下:
devServer:{
        hot:true,
        open:true,
        port:4321
    }
2.在头部引入webpack模块:
var webpack = require ('webpack' );
在plugins节点下新增:
new webpack.HotModuleReplacementPlugin()
使用webpack打包less文件
运行cnpm i less-loader less -D
修改webpack.config.js这个配置文件:
{ test: /\.less$/, use: ['style-loader', 'css-loader', 'less-loader'] },
使用webpack打包sass文件
运行cnpm i sass-loader node-sass --save-dev
在webpack.config.js中添加处理sass文件的loader模块:
{ test: /\.scss$/, use: ['style-loader', 'css-loader', 'sass-loader'] }
使用webpack处理css中的路径
运行cnpm i url-loader file-loader --save-dev
在webpack.config.js中添加处理url路径的loader模块:
{ test: /\.(png|jpg|gif)$/, use: 'url-loader' }
可以通过limit指定进行base64编码的图片大小;只有小于指定字节(byte)的图片才会进行base64编码:
{ test: /\.(png|jpg|gif)$/, use: 'url-loader?limit=43960' },
使用babel处理高级JS语法
运行cnpm i babel-core babel-loader babel-plugin-transform-runtime --save-dev安装babel的相关loader包
运行cnpm i babel-preset-es2015 babel-preset-stage-0 --save-dev安装babel转换的语法
在webpack.config.js中添加相关loader模块,其中需要注意的是,一定要把node_modules文件夹添加到排除项:
{ test: /\.js$/, use: 'babel-loader', exclude: /node_modules/ }
在项目根目录中添加.babelrc文件,并修改这个配置文件如下:
{
    "presets":["es2015", "stage-0"],
    "plugins":["transform-runtime"]
}
注意:语法插件babel-preset-es2015可以更新为babel-preset-env,它包含了所有的ES相关的语法;
注意: 有时候使用npm i node-sass -D装不上,这时候,就必须使用 cnpm i node-sass -D
在普通页面中使用render函数渲染组件 在webpack中配置.vue组件页面的解析
运行cnpm i vue -S将vue安装为运行依赖;
运行cnpm i vue-loader vue-template-compiler -D将解析转换vue的包安装为开发依赖;
运行cnpm i style-loader css-loader -D将解析转换CSS的包安装为开发依赖,因为.vue文件中会写CSS样式;
在webpack.config.js中,添加如下module规则:
module: {
    rules: [
      { test: /\.css$/, use: ['style-loader', 'css-loader'] },
      { test: /\.vue$/, use: 'vue-loader' }
    ]
  }
创建App.js组件页面:
<template>
  <!-- 注意:在 .vue 的组件中,template 中必须有且只有唯一的根元素进行包裹,一般都用 div 当作唯一的根元素 -->
  <div>
    <h1>这是APP组件 - {{msg}}</h1>
    <h3>我是h3</h3>
  </div>
</template>
<script>
// 注意:在 .vue 的组件中,通过 script 标签来定义组件的行为,需要使用 ES6 中提供的 export default 方式,导出一个vue实例对象

export default {

  data() {

    return {

      msg: 'OK'

    }

  }

}

</script>


<style scoped>

h1 {

  color: red;

}

</style>
创建main.js入口文件:
// 导入 Vue 组件
   import Vue from 'vue'
   // 导入 App组件
   import App from './components/App.vue'

   // 创建一个 Vue 实例,使用 render 函数,渲染指定的组件

   var vm = new Vue({
     el: '#app',
     render: c => c(App)
   });
在使用webpack构建的Vue项目中使用模板对象?
在webpack.config.js中添加resolve属性:
resolve: {
    alias: {
      'vue$': 'vue/dist/vue.esm.js'
    }
  }
ES6中语法使用总结
使用 export default 和 export 导出模块中的成员; 对应ES5中的 module.exports 和 export
使用 import ** from ** 和 import '路径' 还有 import {a, b} from '模块标识' 导入其他模块
使用箭头函数:(a, b)=> { return a-b; }
在vue组件页面中,集成vue-router路由模块 vue-router官网
导入路由模块:
import VueRouter from 'vue-router'
安装路由模块:
导入需要展示的组件:
import login from './components/account/login.vue'

import register from './components/account/register.vue'
创建路由对象:
var router = new VueRouter({
  routes: [
    { path: '/', redirect: '/login' },
    { path: '/login', component: login },
    { path: '/register', component: register }
  ]
});
将路由对象,挂载到 Vue 实例上:
var vm = new Vue({
  el: '#app',
  // render: c => { return c(App) }
  render(c) {
    return c(App);
  },
  router // 将路由对象,挂载到 Vue 实例上

});
改造App.vue组件,在 template 中,添加router-link和router-view:
<router-link to="/login">登录</router-link>
   <router-link to="/register">注册</router-link>
   <router-view></router-view>
组件中的css作用域问题 抽离路由为单独的模块 使用 饿了么的 MintUI 组件 Github 仓储地址
Mint-UI官方文档
导入所有MintUI组件:
import MintUI from 'mint-ui'
导入样式表:
import 'mint-ui/lib/style.css'
在 vue 中使用 MintUI:
使用的例子:
<mt-button type="primary" size="large">primary</mt-button>
使用 MUI 组件 官网首页
文档地址
导入 MUI 的样式表:
import '../lib/mui/css/mui.min.css'
在webpack.config.js中添加新的loader规则:
{ test: /\.(png|jpg|gif|ttf)$/, use: 'url-loader' }
根据官方提供的文档和example,尝试使用相关的组件
将项目源码托管到oschina中
点击头像 -> 修改资料 -> SSH公钥 如何生成SSH公钥
创建自己的空仓储,使用 git config --global user.name "用户名" 和 git config --global user.email ***@**.com 来全局配置提交时用户的名称和邮箱
使用 git init 在本地初始化项目
使用 touch README.md 和 touch .gitignore 来创建项目的说明文件和忽略文件;
使用 git add . 将所有文件托管到 git 中
使用 git commit -m "init project" 将项目进行本地提交
使用 git remote add origin 仓储地址将本地项目和远程仓储连接,并使用origin最为远程仓储的别名
使用 git push -u origin master 将本地代码push到仓储中
App.vue 组件的基本设置
头部的固定导航栏使用 Mint-UI 的 Header 组件;
底部的页签使用 mui 的 tabbar;
购物车的图标,使用 icons-extra 中的 mui-icon-extra mui-icon-extra-cart,同时,应该把其依赖的字体图标文件 mui-icons-extra.ttf,复制到 fonts 目录下!
将底部的页签,改造成 router-link 来实现单页面的切换;
Tab Bar 路由激活时候设置高亮的两种方式:
.router-link-active{

    	color:#007aff !important;
  }
或者在 new VueRouter 的时候,通过 linkActiveClass 来指定高亮的类:
// 创建路由对象

  var router = new VueRouter({

    routes: [

      { path: '/', redirect: '/home' }

    ],

    linkActiveClass: 'mui-active'

  });
实现 tabbar 页签不同组件页面的切换
将 tabbar 改造成 router-link 形式,并指定每个连接的 to 属性;
在入口文件中导入需要展示的组件,并创建路由对象:
// 导入需要展示的组件
 import Home from './components/home/home.vue'
 import Member from './components/member/member.vue'
 import Shopcar from './components/shopcar/shopcar.vue'
 import Search from './components/search/search.vue'
 // 创建路由对象
 var router = new VueRouter({
   routes: [
     { path: '/', redirect: '/home' },
     { path: '/home', component: Home },
     { path: '/member', component: Member },
     { path: '/shopcar', component: Shopcar },
     { path: '/search', component: Search }
   ],
   linkActiveClass: 'mui-active'
 });
使用 mt-swipe 轮播图组件
假数据:
lunbo: [       'http://www.itcast.cn/images/slidead/BEIJING/2017440109442800.jpg',        'http://www.itcast.cn/images/slidead/BEIJING/2017511009514700.jpg',   'http://www.itcast.cn/images/slidead/BEIJING/2017421414422600.jpg'
      ]
引入轮播图组件:
<div class ="home-swipe" > <mt-swipe :auto ="4000" > <mt-swipe-item v-for ="(item, i) in lunbo" :key ="i" > <img :src ="item" alt ="" > </mt-swipe-item > </mt-swipe > </div > </div >
在.vue组件中使用vue-resource获取数据
运行cnpm i vue-resource -S安装模块
导入 vue-resource 组件
import VueResource from 'vue-resource'
在vue中使用 vue-resource 组件
使用mui的tab-top-webview-main完成分类滑动栏 兼容问题
和 App.vue 中的 router-link 身上的类名 mui-tab-item 存在兼容性问题,导致tab栏失效,可以把mui-tab-item改名为mui-tab-item1,并复制相关的类样式,来解决这个问题;
.mui-bar-tab .mui-tab-item1.mui-active {
  color: #007aff;
}

.mui-bar-tab .mui-tab-item1 {
  display: table-cell;
  overflow: hidden;
  width: 1%;
  height: 50px;
  text-align: center;
  vertical-align: middle;
  white-space: nowrap;
  text-overflow: ellipsis;
  color: #929292;
}

.mui-bar-tab .mui-tab-item1 .mui-icon {
  top: 3px;
  width: 24px;
  height: 24px;
  padding-top: 0;
  padding-bottom: 0;
}

.mui-bar-tab .mui-tab-item1 .mui-icon~.mui-tab-label {
  font-size: 11px;
  display: block;
  overflow: hidden;
  text-overflow: ellipsis;
}
tab-top-webview-main组件第一次显示到页面中的时候,无法被滑动的解决方案:
import mui from '../../../lib/mui/js/mui.min.js'
在 组件的 mounted 事件钩子中,注册 mui 的滚动事件:
mounted() {
  	// 需要在组件的 mounted 事件钩子中,注册 mui 的 scroll 滚动事件
      mui('.mui-scroll-wrapper').scroll({
        deceleration: 0.0005 //flick 减速系数,系数越大,滚动速度越慢,滚动距离越小,默认值0.0006
      });
	}
滑动的时候报警告:Unable to preventDefault inside passive event listener due to target being treated as passive. See https://www.chromestatus.com/features/5093566007214080
解决方法,可以加上* { touch-action: none; } 这句样式去掉。
原因:(是chrome为了提高页面的滑动流畅度而新折腾出来的一个东西) http://www.cnnotes.com/pearl07/p/6589114.html https://developer.mozilla.org/zh-CN/docs/Web/CSS/touch-action
移除严格模式 babel-plugin-transform-remove-strict-mode
一个Vue集成PhotoSwipe图片预览插件
开启Apache的gzip压缩 要让apache支持gzip功能,要用到deflate_Module和headers_Module。打开apache的配置文件httpd.conf,大约在105行左右,找到以下两行内容:(这两行不是连续在一起的)
#LoadModule deflate_module modules/mod_deflate.so
#LoadModule headers_module modules/mod_headers.so
然后将其前面的“#”注释删掉,表示开启gzip压缩功能。开启以后还需要进行相关配置。在httpd.conf文件的最后添加以下内容即可:
<IfModule deflate_module>
    #必须的,就像一个开关一样,告诉apache对传输到浏览器的内容进行压缩
    SetOutputFilter DEFLATE
    DeflateCompressionLevel 9
</IfModule>
最少需要加上以上内容,才可以生gzip功能生效。由于没有做其它的额外配置,所以其它相关的配置均使用Apache的默认设置。这里说一下参数“DeflateCompressionLevel”,它表示压缩级别,值从1到9,值越大表示压缩的越厉害。
使用ngrok将本机映射为一个外网的Web服务器 注意:由于默认使用的美国的服务器进行中间转接,所以访问速度炒鸡慢,访问时可启用FQ软件,提高网页打开速度!

 微信
微信 支付宝
支付宝