十、编辑用户资料

创建组件并配置路由
1、创建 views/user/index.vue
<template>
  <div>
    <van-nav-bar title="个人信息" left-arrow right-text="保存" />
    <van-cell-group>
      <van-cell title="头像" is-link>
        <van-image
          round
          width="30"
          height="30"
          fit="cover"
          src="http://toutiao.meiduo.site/FgSTA3msGyxp5-Oufnm5c0kjVgW7"
        />
      </van-cell>
      <van-cell title="昵称" value="abc" is-link />
      <van-cell title="性别" value="男" is-link />
      <van-cell title="生日" value="2019-9-27" is-link />
    </van-cell-group>
  </div>
</template>

<script>
  export default {
    name: "UserIndex"
  };
</script>
|
2、将该页面配置到根路由
{
  name: 'user-profile',
  path: '/user/profile',
  component: () => import('@/views/user-profile')
}
|
页面布局
<template>
<div class="user-profile">
<van-nav-bar
class="page-nav-bar"
title="个人信息"
left-arrow
@click-left="$router.back()"
/>
<van-cell class="avatar-cell" title="头像" is-link center>
<van-image
class="avatar"
round
fit="cover"
src="https://img.yzcdn.cn/vant/cat.jpeg"
/>
</van-cell>
<van-cell title="昵称" value="内容" is-link />
<van-cell title="性别" value="内容" is-link />
<van-cell title="生日" value="内容" is-link />
</div>
</template>
<script>
export default {
name: 'UserProfile',
components: {},
props: {},
data () {
return {}
},
computed: {},
watch: {},
created () {},
mounted () {},
methods: {}
}
</script>
<style scoped lang="less">
.user-profile {
.avatar-cell {
.van-cell__value {
display: flex;
flex-direction: row-reverse;
}
.avatar {
width: 60px;
height: 60px;
}
}
}
</style>
|
展示用户信息
思路:
- 找到数据接口
- 封装请求方法
- 请求获取数据
- 模板绑定
1、在 api/user.js 中添加封装数据接口
2、在 views/user/index.vue 组件中请求获取数据
3、模板绑定
修改昵称
一、准备弹出层
二、封装组件
三、页面布局
四、基本功能处理
五、更新完成
修改性别
修改生日
修改头像
图片上传预览
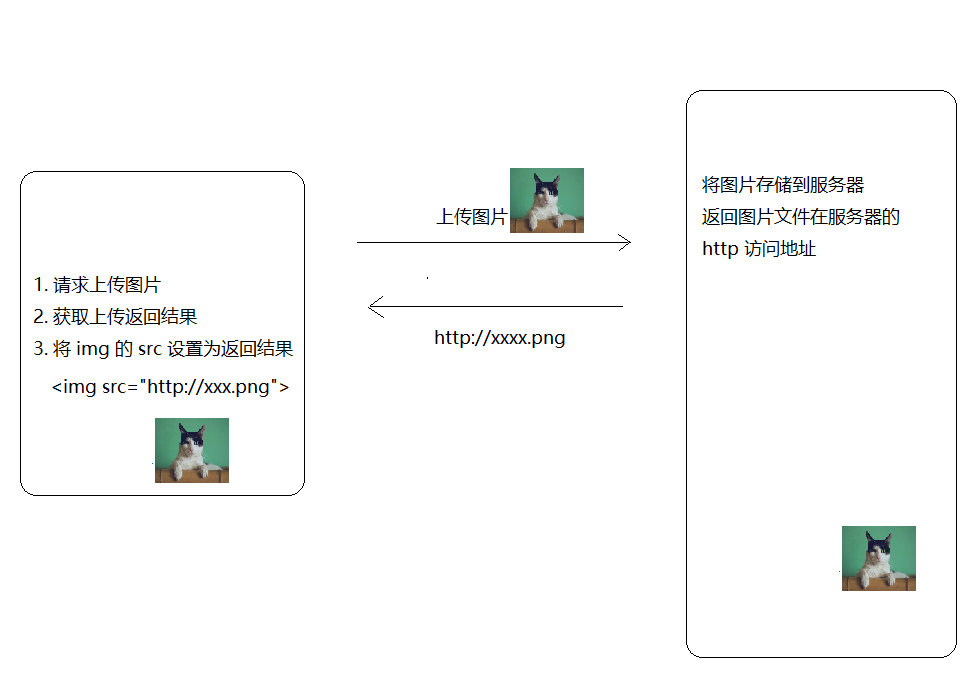
方式一:结合服务器的图片上传预览
方式二:纯客户端实现上传图片预览
const file = fileInput.files[0]
img.src = window.URL.createObjectURL(file)
|
客户端上传预览示例:
<!DOCTYPE html>
<html lang="en">
<head>
<meta charset="UTF-8">
<title>客户端图片上传预览示例</title>
<style>
.img-wrap {
width: 200px;
height: 200px;
border: 1px solid #ccc;
}
img {
max-width: 100%;
}
</style>
</head>
<body>
<h1>客户端图片上传预览示例</h1>
<div class="img-wrap">
<img src="" alt="" id="img">
</div>
<br>
<input type="file" id="file" onchange="onFileChange()">
<script>
const img = document.querySelector('#img')
const file = document.querySelector('#file')
function onFileChange() {
const fileObj = file.files[0]
const data = window.URL.createObjectURL(fileObj)
img.src = data
}
</script>
</body>
</html>
|
接下来就是在项目中使用纯客户端的方式处理用户头像上传预览。
在 views/user/index.vue 组件中:
<template>
<div>
<van-nav-bar title="个人信息" left-arrow right-text="保存" />
<van-cell-group>
+
<van-cell title="头像" is-link @click="onChangePhoto">
<van-image round width="30" height="30" :src="user.photo" />
</van-cell>
<van-cell title="昵称" :value="user.name" is-link />
<van-cell title="性别" :value="user.gender === 0 ? '男' : '女'" is-link />
<van-cell title="生日" :value="user.birthday" is-link />
</van-cell-group>
+ <input type="file" hidden ref="file" @change="onFileChange" />
</div>
</template>
<script>
import { getProfile } from '@/api/user'
export default {
name: 'UserIndex',
data () {
return {
user: {}
}
},
created () {
this.loadUserProfile()
},
methods: {
async loadUserProfile () {
const { data } = await getProfile()
this.user = data.data
},
+ onChangePhoto () {
this.$refs.file.click()
},
+ onFileChange () {
this.user.photo = window.URL.createObjectURL(this.$refs.file.files[0])
}
}
}
</script>
|
头像裁切
方案一:结合服务端的图片裁切上传流程

方案二:纯客户端的图片裁切上传流程
viewMode: 1,
dragMode: 'move',
aspectRatio: 1,
autoCropArea: 1,
cropBoxMovable: false,
cropBoxResizable: false,
background: false,
movable: true
|
保存更新
如果是基于服务端的裁切,则使用:getData 方法,该方法得到裁切的区域参数。
如果是纯客户端的图片裁切,则使用:getCroppedCanvas 方法,该方法得到裁切之后的图片对象(类似于URL.createObjectURL 方法得到的文件对象)。
步骤:
1、在 api/user.js 中添加封装数据接口
import request from '@/utils/request'
export function login (user) {
return request({
method: 'POST',
url: '/app/v1_0/authorizations',
data: user
})
}
export function followUser (userId) {
return request({
method: 'POST',
url: '/app/v1_0/user/followings',
data: {
target: userId
}
})
}
export function unFollowUser (userId) {
return request({
method: 'DELETE',
url: '/app/v1_0/user/followings/' + userId
})
}
export function getSelf (userId) {
return request({
method: 'GET',
url: '/app/v1_0/user'
})
}
export function getProfile (userId) {
return request({
method: 'GET',
url: '/app/v1_0/user/profile'
})
}
+ export function updateUserPhoto (data) {
return request({
method: 'PATCH',
url: '/app/v1_0/user/photo',
data
})
}
|
2、在 views/user/index.vue 组件中保存提交
<template>
<div>
<van-nav-bar
title="个人信息"
left-arrow
right-text="保存"
+
@click-right="onSave"
/>
<van-cell-group>
<van-cell title="头像" is-link @click="onChangePhoto">
<van-image round width="30" height="30" :src="user.photo" />
</van-cell>
<van-cell title="昵称" :value="user.name" is-link />
<van-cell title="性别" :value="user.gender === 0 ? '男' : '女'" is-link />
<van-cell title="生日" :value="user.birthday" is-link />
</van-cell-group>
<input type="file" hidden ref="file" @change="onFileChange" />
</div>
</template>
<script>
+ import { getProfile, updateUserPhoto } from '@/api/user'
export default {
name: 'UserIndex',
data () {
return {
user: {}
}
},
created () {
this.loadUserProfile()
},
methods: {
async loadUserProfile () {
const { data } = await getProfile()
this.user = data.data
},
onChangePhoto () {
this.$refs.file.click()
},
onFileChange () {
const fileObj = this.$refs.file.files[0]
if (fileObj) {
this.user.photo = window.URL.createObjectURL(fileObj)
}
},
+ async onSave () {
this.$toast.loading({
duration: 0,
forbidClick: true,
loadingType: 'spinner',
message: '保存中'
})
try {
const formData = new FormData()
formData.append('photo', this.$refs.file.files[0])
await updateUserPhoto(formData)
this.$toast.success('保存成功')
} catch (err) {
console.log(err)
this.$toast.fail('保存失败')
}
}
}
}
</script>
|

 微信
微信 支付宝
支付宝